本文将根据官方说明文档、一些 Qt 书籍、及一些个人经验来讲解 Qt 的基础知识,鉴于水平有限,可能会有些错误。
这篇文章的目的主要是我个人使用。
本文结构
Qt 概述
Qt 是一个跨平台的应用开发框架,它被广泛用于开发 GUI 应用,一些著名的软件,如 Opera、Google Earth 和 Skype 都是基于它进行开发的,你可以用它创建开源应用程序以及商业应用程序。相对于只支持 Windows 的 MFC 来说,虽然 MFC 更为强大,但是 MFC 的封装不是很好,很多地方很杂乱(来自网络),Qt 除了跨平台之外,各个组件也封装得非常好,这意味着使用 Qt 你将更容易的编写程序。
Qt 一般使用 C++ 进行开发,通过语言绑定,也可以使用其它语言。
Qt 开放源代码,你可以在 github 上获取;其提供三种授权方式:
- 商业版:可以任意的修改源代码而不必公开,适用于开发专属或商业软件;
- GNU LGPL:可以被专属软件作为类库引用、发布和销售;
- GNU GPL:可以自由运行,学习,共享和修改。
Hello Qt
到 Qt Downloads 下载开源 Qt,选择 mingw 安装完成后开始我们的第一个程序–Hello QT。
首先,我们创建一个文件夹,例如E:\qt_practice,然后创建一个main.cpp:
#include <QDebug>

int main()
{
    qDebug() << "Hello QT.";
	return 0;
}
然后打开 qt 命令行:
$ cd E:\qt_practice
$ qmake -project       # 生成 QT 工程文件
这时会生成一个 .pro 文件:
TEMPLATE = app
TARGET = qt_practice
INCLUDEPATH += .

# Input
SOURCES += main.cpp
由于我们需要在命令行上进行输出,所以在 .pro 文件末尾加上 CONFIG += console,然后执行:
$ qmake          # 生成 makefile
$ mingw32-make   # 编译
这里默认执行的是 mingw32-make -f Makefile.Release,你也可以手动执行 mingw32-make -f Makefile.Debug,然后你会在相应文件夹下看到可运行的 exe:
$ release\qt_practice.exe
Hello QT.
可以看到,qDebug 默认会输出换行,如果你了解输出缓冲和一些输出调试的知识的话,这个换行是为了调试正确而加上的。
命令行参数
所谓命令行参数,举一个简单的例子:
prog -i file_in -o file_out
其中 file_in 和 file_out 就是命令行参数,而 i 和 o 被称为命令行选项,命令行选项通常用来表示后面命令行参数的类型,这意味着你可以修改命令行参数的顺序:
prog -o file_out -i file_in
我知道 linux 下面有 getopt 函数可以获取命令行参数,但标准 C++ 似乎没有这种函数,所以一般我都是将命令行参数转化为 std::string,然后自行解析。你可以查看 stackoverflow 获取如何在标准 C++ 中进行命令行参数解析。
Qt 提供了 QCommandLineParser 专门用于命令行参数解析。
命令行选项通常以单个破折号或双个破折号开始,单个字母的命令行选项可以进行合并,如 -a -b -c 可以写成 -abc,但多个字母的命令行选项不能进行合并,且一般以双个破折号开始。
你可以使用等号或空格符为选项赋值:
-v=value --verbose=value
-v value --verbose value
我仿照官方示例做了一个演示:
#include <QDebug>
#include <QCoreApplication>
#include <QCommandLineParser>

void initInputParser(QCommandLineParser &parser);

int main(int argc, char *argv[])
{
	// QCoreApplication 提供命令行参数作为一个简单的字符串列表
	QCoreApplication app(argc, argv);
	QCoreApplication::setApplicationName("my-copy-program");
	QCoreApplication::setApplicationVersion("1.0");

	// QCommandLineParser 初始化,由于其不可复制,故而采用引用方式进行处理
	QCommandLineParser parser;
	initInputParser(parser);

	// 处理用户给出的实际命令行参数
	parser.process(app);

	// 所有基于位置的命令行参数列表,可能包含未定义的命令行参数
	const QStringList args = parser.positionalArguments();

	// 检查命令行选项是否被指定,多个名字的话被认为是相等的
	bool showProgress = parser.isSet("p");
	bool force = parser.isSet("f");
	bool target = parser.isSet("t");
	bool dft = parser.isSet("default");

	// 获取命令行选项对应的值,即命令行参数
	QString targetDir = parser.value("t");
	QString defaultName = parser.value("default-name");

	// 输出
	qDebug() << "-p: " << showProgress;
	qDebug() << "-f: " << force;
	qDebug() << "-t, --target-directory: " << target;
	qDebug() << "-d, --default, --default-name: " << dft;

	qDebug() << "target directory: " << targetDir;
	qDebug() << "default name: " << defaultName;

	qDebug() << "positionalArguments: ";
	for (int i = 0; i < args.size(); ++i) {
		qDebug() << " " << args[i];
	}
}

void initInputParser(QCommandLineParser &parser)
{
	parser.setApplicationDescription("Test helper");
	parser.addHelpOption();    // -h, --help and -? on Windows
	parser.addVersionOption(); // -v / --version

	// 添加基于位置的命令行参数,这意味着你不能随意调换它们的相对顺序
	// QCoreApplication::translate: 返回第二个参数翻译后的字符串,这意味着支持多种语言
	parser.addPositionalArgument("source",
		QCoreApplication::translate("main", "Source file to copy."));
	parser.addPositionalArgument("destination",
		QCoreApplication::translate("main", "Destination directory."));

	// http://doc.qt.io/qt-5/qcommandlineparser.html#addOptions
	// http://doc.qt.io/qt-5/qcommandlineoption.html
	parser.addOptions({
		// 不带命令行参数的命令行选项(-p),这意味着你不能为该选项赋值
		// 第二个参数是选项描述,见帮助菜单
		{ "p",
			QCoreApplication::translate("main", "Show progress during copy") },
		// 不带命令行参数的命令行选项(-f, --force)
		// 为一个选项指定多个名字时,列表中任何单个字符的名字都被认为是短名
		// 名字列表不允许为空,名字不能以破折号或斜杠开头、不能包含=、也不能重复
		{ { "f", "force" },
			QCoreApplication::translate("main", "Overwrite existing files.") },
		// 带命令行参数的命令行选项(-t, --target-directory)
		// 第三个参数为命令行参数名,见帮助菜单
		{ { "t", "target-directory" },
			QCoreApplication::translate("main", "Copy all source files into <directory>."),
			QCoreApplication::translate("main", "directory") },
		// 带命令行参数的命令行选项(-d, --default, --default-name)
		// 第四个参数为默认选项值
		{ { "d","default","default-name" },
			QCoreApplication::translate("main", "default name <name>."),
			QCoreApplication::translate("main", "name"),
			QCoreApplication::translate("main", "untitled") }
	});
}
编译完成之后,首先查看 help:
$ release\qt_practice.exe -h
Usage: release\qt_practice.exe [options] source destination
Test helper

Options:
  -?, -h, --help                        Displays this help.
  -v, --version                         Displays version information.
  -p                                    Show progress during copy
  -f, --force                           Overwrite existing files.
  -t, --target-directory <directory>    Copy all source files into <directory>.
  -d, --default, --default-name <name>  default name <name>.

Arguments:
  source                                Source file to copy.
  destination                           Destination directory.
这样就对上面的代码有了更深的了解了,接下来我们只需要按照 help 显示的那样进行测试即可:
$ release\qt_practice.exe -v
my-copy-program 1.0

$ release\qt_practice.exe -pf -t target -d default src dst undef
-p:  true
-f:  true
-t, --target-directory:  true
-d, --default, --default-name:  true
target directory:  "target"
default name:  "default"
positionalArguments:
  "src"
  "dst"
  "undef"

$ release\qt_practice.exe src dst -t=dir undef
-p:  false
-f:  false
-t, --target-directory:  true
-d, --default, --default-name:  false
target directory:  "dir"
default name:  "untitled"
positionalArguments:
  "src"
  "dst"
  "undef"

$ release\qt_practice.exe -a
Unknown option 'a'.

$ release\qt_practice.exe -t
Missing value after '-t'.

$ release\qt_practice.exe -default name
-p:  false
-f:  false
-t, --target-directory:  false
-d, --default, --default-name:  true
target directory:  ""
default name:  "efault"
positionalArguments:
  "name"

$ release\qt_practice.exe --default name
-p:  false
-f:  false
-t, --target-directory:  false
-d, --default, --default-name:  true
target directory:  ""
default name:  "name"
positionalArguments:
可以看到:
- 如果一个选项被设置为需要一个值,则必须存在一个;
- 当不指定有默认值的选项时,就会得到该选项的默认值;
- 使用长字符选项时一定要使用双破折号。
字符串
Qt5 默认兼容标准 C++11,但 Qt4 需要在 .pro 文件中加上 CONFIG += c++11,这意味着你不必特意去学习新的类似的库,能用标准 C++ 处理的就用标准 C++ 进行处理,但在 Qt 下写程序你却全部使用标准 C++,那使用 Qt 的意义又在哪儿呢?由于 Qt 所有 API 的参数和返回值除了简单类型之外都是自行封装的,这又意味着你需要对 Qt 的库有一定的了解才行。
Qt 有两个类来存储字符串,它们分别是 QString 和 QByteArray。其中 QString 是 Qt 最为常用的字符串,因为它存储了一串 QChar 字符,而一个 QChar 提供了一个16位的 Unicode 字符;而 QByteArray 提供的是一个字节数组,它通常被用来存储以空字符 '\0' 结尾的8位字符串。除了需要存储原始二进制数据或者对内存保护要求很高的情况下,一般都推荐使用 QString,但使用 QByteArray 比使用 const char * 更方便,它确保数据后跟 '\0' 终止符。
QString 和 QByteArray 都是采用的写时复制来减少内存使用量和不必要的复制操作。
下面我们就来对 QString 的常用操作来做一个简单的演示,更多的操作你可以查看说明文档:
#include <string>     // 标准字符串

#include <QDebug>
#include <QString>

int main()
{
	std::string std_str = "World";

	// 赋值
	QString str0 = QChar('H');                      // QChar 赋值运算符
	QString str1 = "Hello";                         // const char* 赋值运算符
	QString str2 = QString::fromStdString(std_str); // 标准字符串转 QString
	qDebug() << str0 << " " << str1 << " " << str2;

	// 访问
	bool isEmpty = str2.isEmpty();                  // 是否为空
	int size = str0.size();                         // 获取字符串大小
	str0[0] = QChar('E');                           // 修改字符
	QChar ch = str1.at(1);                          // at 用于只读
	qDebug() << str0 << " size: " << size;
	qDebug() << str1 << ".at(1): " << ch;
	qDebug() << str2 << " is empty?: " << isEmpty;

	// 修改
	str0.prepend("haha");                           // 前置添加
	str0.push_front("wa");                          // 前置添加
	str1.append(" ");                               // 后置添加
	str1.push_back(str2);                           // 后置添加
	str1 += "!";                                    // 后置添加
	str2.insert(0, "Hello ");                       // 在位置0上插入“Hello "
	QString str3 = str2;                            // str3: Hello World
	str3.replace(6, 5, "QT");                       // 将从位置6开始的5个字符替换为"QT"
	QString str4(str3);                             // str4: Hello QT
	str4.remove(0, 6);                              // 移除从位置0开始的6个字符
	str3.swap(str4);                                // 交换
	qDebug() << str0 << " " << str1 << " "
		<< str2 << " " << str3 << " " << str4;

	// 获取子串
	QString sub0 = str2.right(5);                   // 右边5个字符
	QString sub1 = str2.mid(1, 4);                  // 位置1开始4个字符
	QString sub2 = str2.left(5);                    // 左边5个字符
	qDebug() << sub0 << " " << sub1 << " " << sub2;

	// 比较
	QString str5("_raw.png");
	QString str6("_RAW.png");
	bool equal = (str5 == str6);                    // 比较运算符
	bool startsWith = str5.startsWith("_");         // 是否以"_"开始
	bool endsWith = str5.endsWith(".png");          // 是否以".png"结尾
	bool contains =
		str5.contains("RAW", Qt::CaseInsensitive);  // 是否包含"raw",大小写无关
	qDebug() << equal << " " << startsWith << " "
		<< endsWith << " " << contains;

	// 动态字符串
	QString s0 = "file name is %1, function name is %2.";
	QString s1 = s0.arg(__FILE__);                  // 将s1的最小的标记%1替换为文件名
	QString s2 = s1.arg(__func__);                  // 将s2的最小的标记%2替换为函数名
	qDebug() << s0 << "\n" << s1 << "\n" << s2;

	// 转换
	QString str_num0 = QString::number(123);        // 数字转 QString
	QString str_num1 = QString().setNum(1.234);     // 数字转 QString
	std::string std_num = str_num0.toStdString();   // QString 转 std::string
	int num0 = str_num0.toInt();                    // QString 转数字
	double num1 = str_num1.toDouble();              // QString 转数字
	str5 = str5.toUpper();                          // 转换为大写
	str6 = str6.toLower();                          // 转换为小写
	qDebug() << str_num0 << ": " << num0 << ", "
		<< str_num1 << ": " << num1;
	qDebug() << str5 << " " << str6;

	// 字符类型
	QString str7 = "7 white, 3 red roses.";
	int digits = 0, letters = 0;
	int spaces = 0, puncts = 0;
	for (const QChar &s : str7)
	{
		if (s.isDigit()) {
			digits++;
		}
		else if (s.isLetter()) {
			letters++;
		}
		else if (s.isSpace()) {
			spaces++;
		}
		else if (s.isPunct()) {
			puncts++;
		}
	}
	qDebug() << QString("There are %1 characters").arg(str7.count());
	qDebug() << QString("There are %1 letters").arg(letters);
	qDebug() << QString("There are %1 digits").arg(digits);
	qDebug() << QString("There are %1 spaces").arg(spaces);
	qDebug() << QString("There are %1 punctuation characters").arg(puncts);
}
结果:
$ release\qt_practice.exe
"H"   "Hello"   "World"
"E"  size:  1
"Hello" .at(1):  'e'
"World"  is empty?:  false
"wahahaE"   "Hello World!"   "Hello World"   "QT"   "Hello QT"
"World"   "ello"   "Hello"
false   true   true   true
"file name is %1, function name is %2."
 "file name is main.cpp, function name is %2."
 "file name is main.cpp, function name is main."
"123" :  123 ,  "1.234" :  1.234
"_RAW.PNG"   "_raw.png"
"There are 21 characters"
"There are 13 letters"
"There are 2 digits"
"There are 4 spaces"
"There are 2 punctuation characters"
上面打印出来的字符串有引号,如果你觉得不爽的话,可以使用 qPrintable 全局函数将 QString 转换为 const char * 后再进行输出。
QVariant
QVariant 像是一个 Qt 常见数据类型的共用体。由于标准 union 只支持有默认构造函数和析构函数的类型,然而许多有用的 Qt 类都不满足这一要求,所以有了 QVariant。
一个 QVariant 对象在同一时间只持有一种数据类型的一个值,假定该类型为 T,那么你就可以使用成员函数 toT() 来获取这个值,你还可以使用成员函数 canConvert 来判断该类型是否能够转换到你想要的类型,你甚至可以使用成员函数 typename() 来得到该类型的类型字符串。
由于 QVariant 是 Qt Core 模块的一部分,所以没有提供 Qt GUI 定义的数据类型的额转换函数 toT(),但是 QVariant 支持的类型是包含一些 GUI 定义的类型的,如 QColor、QImage、QPixmap 等,这时你可以使用成员函数 value 或者强制转换函数 qvariant_cast 来获取存储的值,实际上所有的 QVariant 对象都可以使用这样的方式来获取值。
演示:
#include <QDebug>
#include <QColor>
#include <QString>
#include <QVariant>

int main()
{
	QVariant v(123);
	bool isInt = v.canConvert<int>();        // 能否转为 int
	bool isString = v.canConvert<QString>(); // 能否转为 QString
	int x = v.toInt();                       // 转换到 int
	QString str = v.toString();              // 转换到 QString
	QString type = v.typeName();             // v 的类型
	qDebug() << "QVariant: " << v;
	qDebug() << "isInt: " << isInt;
	qDebug() << "isString: " << isString;
	qDebug() << "toInt: " << x;
	qDebug() << "toString: " << str;
	qDebug() << "typeName: " << type;

	QColor color = QColor(Qt::red);
	v = color;
	qDebug() << "QVariant: " << v;
	qDebug() << "typeName: " << v.typeName();
	qDebug() << "value: " << v.value<QColor>();
	qDebug() << "value: " << qvariant_cast<QColor>(v);
}
结果:
$ release\qt_practice.exe
QVariant:  QVariant(int, 123)
isInt:  true
isString:  true
toInt:  123
toString:  "123"
typeName:  "int"
QVariant:  QVariant(QColor, QColor(ARGB 1, 1, 0, 0))
typeName:  QColor
value:  QColor(ARGB 1, 1, 0, 0)
value:  QColor(ARGB 1, 1, 0, 0)
日期时间
熟悉 C 的兄弟们应该知道 <time.h> 是专门用来处理日期时间的,C++ 将该头文件放在命名空间 std 下,并重新构建了一个新的头文件 <ctime>,你可以使用该头文件来获取日期时间:
#include <ctime>
#include <string>
#include <iostream>

int main()
{
	time_t t = time(0);   // get time now
	struct tm * now = localtime(&t);

	std::cout << "year: " << now->tm_year + 1900 << "\n"
		<< "month: " << now->tm_mon + 1 << "\n"
		<< "day: " << now->tm_mday << "\n"
		<< "hour: " << now->tm_hour << "\n"
		<< "minute: " << now->tm_min << "\n"
		<< "second: " << now->tm_sec
		<< std::endl;
}
结果:
$ release\qt_practice.exe
year: 2017
month: 8
day: 31
hour: 15
minute: 8
second: 21
在 C++11 中还有头文件 <chrono> 中的 system_clock 也可以获取当前时间,因为它提供了向 time_t 的类型转换函数 to_time_t,另外它还支持超高精度的计时功能,而使用 time_t 你只能获取到精确到秒的计时功能:
#include <ctime>
#include <thread> // sleep_for
#include <chrono>
#include <iostream>

int main()
{
	//auto now_steady = std::chrono::steady_clock::now();
	auto now_system = std::chrono::system_clock::now();

	time_t now = std::chrono::system_clock::to_time_t(now_system);
	std::cout << ctime(&now) << std::endl;  // unsafe way

	// safe way
	/*char buffer[26];
	ctime_s(buffer, 26, &now);
	std::cout << buffer << std::endl;*/

	// 计时
	// https://chorior.github.io/2017/04/24/C++-%E5%A4%9A%E7%BA%BF%E7%A8%8B%E5%9F%BA%E7%A1%80%E7%AF%87/#clock
	auto time_start = std::chrono::high_resolution_clock::now();
	std::this_thread::sleep_for(
		std::chrono::duration<double, std::milli>(100.001));
	auto time_stop = std::chrono::high_resolution_clock::now();
	std::cout << "took "
		<< std::chrono::duration<double, std::milli>(time_stop - time_start).count()
		<< " ms\n";
}
结果:
$ release\qt_practice.exe
Thu Aug 31 15:22:07 2017

took 100.01 ms
在 Qt 中,处理日期可以使用 QDate,处理时间可以使用 QTime,日期、时间一起处理可以使用 QDateTime。
QDate
#include <QDate>
#include <QDebug>

int main()
{
	// 访问
	QDate d1 = QDate::currentDate();
	qDebug() << "year: " << d1.year() << "\n"
		<< "month: " << d1.month() << "\n"
		<< "day: " << d1.day() << "\n"
		<< "dayOfWeek: " << d1.dayOfWeek() << "\n"
		<< "dayOfYear: " << d1.dayOfYear() << "\n"
		<< "daysInMonth: " << d1.daysInMonth() << "\n"
		<< "TextDate: " << d1.toString(Qt::TextDate) << "\n"
		<< "ISODate: " << d1.toString(Qt::ISODate) << "\n"
		<< "SystemLocaleShortDate: " << d1.toString(Qt::SystemLocaleShortDate) << "\n"
		<< "SystemLocaleLongDate: " << d1.toString(Qt::SystemLocaleLongDate) << "\n"
		<< "DefaultLocaleShortDate: " << d1.toString(Qt::DefaultLocaleShortDate) << "\n"
		<< "DefaultLocaleLongDate: " << d1.toString(Qt::DefaultLocaleLongDate) << "\n"
		<< "RFC2822Date: " << d1.toString(Qt::RFC2822Date);

	// 字符串转 QDate
	QString str("2017-08-31");
	d1 = QDate::fromString(str, Qt::ISODate);
	qDebug() << d1.toString(Qt::ISODate);

	// 修改、比较
	d1.setDate(2017, 8, 1);
	qDebug() << d1.daysTo(QDate::currentDate()) << "\n"
		<< d1.addDays(2).toString(Qt::ISODate) << "\n"
		<< d1.addMonths(2).toString(Qt::ISODate) << "\n"
		<< d1.addYears(2).toString(Qt::ISODate) << "\n"
		<< d1.toString(Qt::ISODate) << " > "
		<< QDate::currentDate().toString(Qt::ISODate)
		<< " is " << static_cast<bool>(d1 > QDate::currentDate());
}
结果:
$ release\qt_practice.exe
year:  2017
month:  8
day:  31
dayOfWeek:  4
dayOfYear:  243
daysInMonth:  31
TextDate:  "周四 八月 31 2017"
ISODate:  "2017-08-31"
SystemLocaleShortDate:  "2017/8/31"
SystemLocaleLongDate:  "2017年8月31日"
DefaultLocaleShortDate:  "2017/8/31"
DefaultLocaleLongDate:  "2017年8月31日"
RFC2822Date:  "31 Aug 2017"
"2017-08-31"
30
"2017-08-03"
"2017-10-01"
"2019-08-01"
"2017-08-01"  >  "2017-08-31"  is  false
除了使用 Qt 定义的格式进行输出和输入之外,你还可以自定义日期的格式:
| Expression | Output |
|---|---|
| yy | 两位数年份(00~99) |
| yyyy | 四位数年份 |
| M | 不带前置零的月份数(1 ~ 12) |
| MM | 带有前置零的月份数(01 ~ 12) |
| MMM | 短的本地化月份名(如 Jan ~ Dec) |
| MMMM | 长的本地化月份名(如 January ~ December) |
| d | 不带前置零的天数(1 ~ 31) |
| dd | 带有前置零的天数(01 ~ 31) |
| ddd | 短的本地化天名(如 Mon ~ Sun) |
| dddd | 长的本地化天名(如 Monday ~ Sunday) |
#include <QDate>
#include <QDebug>

int main()
{
	QDate cd = QDate::currentDate();

	qDebug() << "Today is " << cd.toString("yyyy-MM-dd");
	qDebug() << "Today is " << cd.toString("yy/M/dd");
	qDebug() << "Today is " << cd.toString("d. M. yyyy");
	qDebug() << "Today is " << cd.toString("d-MMMM-yyyy");

	QString fmt("yyyy-MM-dd");
	QString str("2017-08-31");
	qDebug() << QDate::fromString(str, fmt).toString("yy/M/dd");
}
结果:
$ release\qt_practice.exe
Today is  "2017-08-31"
Today is  "17/8/31"
Today is  "31. 8. 2017"
Today is  "31-八月-2017"
"17/8/31"
QTime
#include <QTime>
#include <QDebug>

int main()
{
	// 访问
	QTime t1 = QTime::currentTime();
	qDebug() << "hour: " << t1.hour() << "\n"
		<< "minute: " << t1.minute() << "\n"
		<< "second: " << t1.second() << "\n"
		<< "msec: " << t1.msec() << "\n"
		<< "TextDate: " << t1.toString(Qt::TextDate) << "\n"
		<< "ISODate: " << t1.toString(Qt::ISODate) << "\n"
		<< "SystemLocaleShortDate: " << t1.toString(Qt::SystemLocaleShortDate) << "\n"
		<< "SystemLocaleLongDate: " << t1.toString(Qt::SystemLocaleLongDate) << "\n"
		<< "DefaultLocaleShortDate: " << t1.toString(Qt::DefaultLocaleShortDate) << "\n"
		<< "DefaultLocaleLongDate: " << t1.toString(Qt::DefaultLocaleLongDate) << "\n"
		<< "RFC2822Date: " << t1.toString(Qt::RFC2822Date);

	// 字符串转 QTime
	QString str("20:02:20.22");
	QTime t2 = QTime::fromString(str, Qt::ISODate);
	qDebug() << t2.toString(Qt::ISODate);

	// 修改、比较
	t1.setHMS(20, 01, 00, 00);
	qDebug() << t1.secsTo(t2) << "\n"
		<< t1.msecsTo(t2) << "\n"
		<< t1.addSecs(2).toString(Qt::ISODate) << "\n"
		<< t1.addMSecs(1000).toString(Qt::ISODate) << "\n"
		<< t1.toString(Qt::ISODate) << " > " << t2.toString(Qt::ISODate)
		<< " is " << static_cast<bool>(t1 > t2);
}
结果:
$ release\qt_practice.exe
hour:  16
minute:  27
second:  49
msec:  351
TextDate:  "16:27:49"
ISODate:  "16:27:49"
SystemLocaleShortDate:  "16:27"
SystemLocaleLongDate:  "16:27:49"
DefaultLocaleShortDate:  "16:27"
DefaultLocaleLongDate:  "16:27:49"
RFC2822Date:  "16:27:49"
"20:02:20"
80
80220
"20:01:02"
"20:01:01"
"20:01:00"  >  "20:02:20"  is  false
除了使用 Qt 定义的格式进行输出和输入之外,你还可以自定义时间的格式:
| Expression | Output |
|---|---|
| AP A |
AM/PM |
| ap a |
am/pm |
| t | 时区 |
| h | 0 ~ 23 或 1 ~ 12 |
| hh | 00 ~ 23 或 01 ~ 12 |
| H | 0 ~ 23 |
| HH | 00 ~ 23 |
| m | 0 ~ 59 |
| mm | 00 ~ 59 |
| s | 0 ~ 59 |
| ss | 00 ~ 59 |
| z | 0 ~ 999 |
| zzz | 000 ~ 999 |
#include <QTime>
#include <QDebug>

int main()
{
	QTime cd = QTime::currentTime();

	qDebug() << "current time is " << cd.toString("hh:mm:ss.zzz");
	qDebug() << "current time is " << cd.toString("h:m:s a");
	qDebug() << "current time is " << cd.toString("H:m:s A");
	qDebug() << "current time is " << cd.toString("h:m AP");

	QString fmt("hh:mm:ss.zzz");
	QString str("20:20:20.200");
	qDebug() << QTime::fromString(str, fmt).toString("h:m:s a");
}
结果:
$ release\qt_practice.exe
current time is  "16:32:43.386"
current time is  "4:32:43 下午"
current time is  "16:32:43 下午"
current time is  "4:32 下午"
"8:20:20 下午"
我们知道时间的计量就是计时,当然你可以自己编写函数进行计时,就像上面的 system_clock 一样,相减就可以,但 Qt 帮你实现了这个 API:
void QTime::start()
{
    *this = currentTime();
}

int QTime::restart()
{
    QTime t = currentTime();
    int n = msecsTo(t);
    if (n < 0)                                // passed midnight
        n += 86400*1000;                      // 一天86400秒
    *this = t;
    return n;
}

int QTime::elapsed() const
{
    int n = msecsTo(currentTime());
    if (n < 0)                                // passed midnight
        n += 86400 * 1000;
    return n;
}
根据上面的源码,你应该很容易进行理解和测试:
#include <thread>  // sleep_for
#include <chrono>

#include <QTime>
#include <QDebug>

int main()
{
	QTime t;
	t.start();
	std::this_thread::sleep_for(
		std::chrono::duration<double, std::milli>(100));

	qDebug() << "took " << t.restart() << " ms";
	std::this_thread::sleep_for(
		std::chrono::duration<double, std::milli>(200));
	qDebug() << "took " << t.elapsed() << " ms";
}
结果:
$ release\qt_practice.exe
took  100  ms
took  206  ms
可以看到,其计时精度只到达毫秒,远不如 chrono 的精度高。
QDateTime
你可以把 QDateTime 当做 QDate 和 QTime 的并集,使用时可以使用成员函数 date() 和 time() 来获取对应的 QDate 和 QTime,修改之后再通过成员函数 setDate 和 setTime 将修改合并到原 QDateTime 实例中;剩余比较独立的函数是 toUTC 和 toTime_t ,其中 UTC 时间是世界标准时间,不随地区、季节的改变而改变,time_t 是 Unix 时间。
#include <QDebug>
#include <QDateTime>

int main()
{
	QDate d = QDate::currentDate();
	QTime t = QTime::currentTime();
	QDateTime dt1(d, t);
	QDateTime dt2 = QDateTime::currentDateTime();
	QDateTime dt3 = QDateTime::currentDateTimeUtc();

	qDebug() << dt1.toString(Qt::ISODate) << "\n"
		<< dt2.toString(Qt::ISODate) << "\n"
		<< dt3.toString(Qt::ISODate) << "\n"
		<< dt2.date().toString(Qt::ISODate) << "\n"
		<< dt2.time().toString(Qt::ISODate) << "\n"
		<< dt1.toUTC().toString(Qt::ISODate) << "\n"
		<< dt2.toTime_t();
}
结果:
$ release\qt_practice.exe
"2017-08-31T16:50:22"
"2017-08-31T16:50:22"
"2017-08-31T08:50:22Z"
"2017-08-31"
"16:50:22"
"2017-08-31T08:50:22Z"
1504169422
文件输入输出
有些时候你可能需要对很多个文件执行相同的操作,比如对几十张图片进行一些算法处理。你当然可以手动将这些文件的名字一一写死到程序里面,但是如果有一天需要换一批文件,你是否又需要一个一个去写呢?遇到这种问题,我一般都是将所有文件放在同一个目录下,让程序去一个个读,然后进行操作。但 C++11 并没有读取目录的接口,你可以在 stackoverflow 上找到如何在标准 C++ 里读取目录的方法。就我使用过的来说,dirent.h 确实轻便又好用:
#include <iostream>

#include "dirent.h"

int main()
{
	DIR *dir;
	struct dirent *ent;
	if ((dir = opendir(".")) != NULL)
	{
		/* print all the files and directories within directory */
		while ((ent = readdir(dir)) != NULL)
		{
			std::cout << ent->d_name;
			switch (ent->d_type)
			{
			case DT_REG:
				std::cout << ": DT_REG\n"; break;
			case DT_DIR:
				std::cout << ": DT_DIR\n"; break;
			}
		}
		closedir(dir);
	}
	else {
		/* could not open directory */
		std::cerr << "open directory failed!\n";
		exit(EXIT_FAILURE);
	}
}
由于新添加了一个头文件,所以需要在 .pro 文件中加上 HEADERS += dirent.h,然后重新生成 makefile 并编译:
$ qmake
$ mingw32-make
$ release\qt_practice.exe
.: DT_DIR
..: DT_DIR
.qmake.stash: DT_REG
debug: DT_DIR
dirent.h: DT_REG
main.cpp: DT_REG
Makefile: DT_REG
Makefile.Debug: DT_REG
Makefile.Release: DT_REG
qt_practice.pro: DT_REG
release: DT_DIR
从结果中可以看出,有两个特殊的文件夹 . 和 ..,它们分别代表当前目录与上一级目录。
Qt 提供了 QFile、QDir 和 QFileInfo 来专门处理文件和目录,其中 QFile 用来读写文件,QDir 用来访问目录,QFileInfo 用来获取文件的相关信息(如路径、文件名、修改时间、权限等)。它们一致使用正斜杠 / 来作为文件分隔符,不支持反斜杠,可以使用相对路径。
QFile
我们首先在 e:/qt_practice 目录下创建一个 test.txt:
line1 line1 line1
line2 line2 line2
line3 line3 line3
line4 line4 line4
演示:
#include <QFile>
#include <QDebug>
#include <QString>
#include <QTextStream>

int main()
{
	QString filePath = "e:/qt_practice/test.txt";
	Q_ASSERT(QFile::exists(filePath));  // 是否存在

	QFile file(filePath);

	// 打开文件
	// http://doc.qt.io/qt-5/qiodevice.html#OpenModeFlag-enum
	file.open(QIODevice::ReadWrite | QIODevice::Text);
	if (!file.isOpen()) {
		qDebug() << "open " << filePath << " failed.";
		exit(EXIT_FAILURE);
	}

	// 读取文件
	qDebug() << "file.read(5): " << file.read(5);
	qDebug() << "file.readLine(): " << file.readLine();
	qDebug() << "file.readAll():\n" << file.readAll();
	qDebug() << "file.isEnd(): " << file.atEnd();

	// 写文件
	file.write("\nline5");

	// 位置变换
	qDebug() << "file.pos(): " << file.pos();
	qDebug() << "file.size(): " << file.size();
	file.seek(0);  // 将位置变换到文件开始
	qDebug() << "after seek(0):";
	qDebug() << "file.pos(): " << file.pos();

	// 文件流
	QTextStream stream(&file);
	qDebug() << "stream.read(5): " << stream.read(5);
	qDebug() << "stream.readLine(): " << stream.readLine();
	qDebug() << "stream.readAll():\n" << stream.readAll();
	qDebug() << "stream.isEnd(): " << stream.atEnd();
	qDebug() << "stream.pos(): " << stream.pos();
	stream.seek(0);  // 将位置变换到文件开始
	qDebug() << "after seek(0):";
	qDebug() << "stream.pos(): " << stream.pos();

	// 写文件
	stream << "\nline6";

	// 从当前位置读取文件
	QString str;
	stream >> str;
	qDebug() << "str: " << str;

	// 关闭文件
	file.close(); // QFile 对象销毁时会自动调用
}
结果:
$ release\qt_practice.exe
file.read(5):  "line1"
file.readLine():  " line1 line1\n"
file.readAll():
 "line2 line2 line2\nline3 line3 line3\nline4 line4 line4"
file.isEnd():  true
file.pos():  81
file.size():  81
after seek(0):
file.pos():  0
stream.read(5):  "line1"
stream.readLine():  " line1 line1"
stream.readAll():
 "line2 line2 line2\nline3 line3 line3\nline4 line4 line4\nline5"
stream.isEnd():  true
stream.pos():  81
after seek(0):
stream.pos():  0
str:  "line1"
test.txt:
line1 line1 line1
line2 line2 line2
line3 line3 line3
line4 line4 line4
line5
line6
可以看到,\n 被当做两个字符;QFile 的读写可能会影响流的读写,所以最好不要将它们混用。
QFileInfo
前面我们说过,QFileInfo 提供关于文件或文件夹的相关信息,它可以使用绝对路径,又可以使用相对路径,你可以使用成员函数 isRelative 进行确认,也可以使用成员函数 makeAbsolute 从一个相对路径得到一个绝对路径。
查看其头文件,你会发现其实它能用的函数并不多:
QFileInfo(const QString &file);
QFileInfo(const QFile &file);
QFileInfo(const QDir &dir, const QString &file);
void setFile(const QString &file);
void setFile(const QFile &file);
void setFile(const QDir &dir, const QString &file);
bool exists() const;
static bool exists(const QString &file);
void refresh(); // 刷新文件信息
QString fileName() const;
QString filePath() const;
QString absoluteFilePath() const;
QString suffix() const; // 返回最后一个后缀名
QString completeSuffix() const;
bool isReadable() const;
bool isWritable() const;
bool isExecutable() const;
bool isHidden() const;
bool isFile() const;
bool isDir() const;
bool isSymLink() const;
QString readLink() const;
qint64 size() const;
QDateTime created() const;
QDateTime lastModified() const;
QDateTime lastRead() const;
QString owner() const;
QString group() const;
bool permission(QFile::Permissions permissions) const;
QFile::Permissions permissions() const;
其中 owner、group、permissions 在 NTFS 文件系统上的返回值是不准确的,因为 NTFS 系统默认禁用了所有权的权限的检查,要想启用它,你需要使用:
extern Q_CORE_EXPORT int qt_ntfs_permission_lookup;
qt_ntfs_permission_lookup++; // turn checking on
qt_ntfs_permission_lookup--; // turn it off again
查看 QFile::Permissions:
enum Permission {
	ReadOwner = 0x4000, WriteOwner = 0x2000, ExeOwner = 0x1000,
	ReadUser  = 0x0400, WriteUser  = 0x0200, ExeUser  = 0x0100,
	ReadGroup = 0x0040, WriteGroup = 0x0020, ExeGroup = 0x0010,
	ReadOther = 0x0004, WriteOther = 0x0002, ExeOther = 0x0001
};
演示:
#include <QDebug>
#include <QFileInfo>
#include <QDateTime>

extern Q_CORE_EXPORT int qt_ntfs_permission_lookup;

int main(void)
{
	qt_ntfs_permission_lookup++; // turn checking on

	QFileInfo info("main.cpp");

	qDebug() << "isRelative: " << info.isRelative();
	qDebug() << "filePath: " << info.filePath();
	qDebug() << "absoluteFilePath: " << info.absoluteFilePath();
	qDebug() << "fileName: " << info.fileName();
	qDebug() << "exists: " << info.exists();
	qDebug() << "suffix: " << info.suffix();
	qDebug() << "created: " << info.created().toString(Qt::ISODate);
	qDebug() << "lastModified: " << info.lastModified().toString(Qt::ISODate);
	qDebug() << "owner: " << info.owner();
	qDebug() << "permissions: " << info.permissions();

	return 0;
}
结果:
$ release\qt_practice.exe
isRelative:  true
filePath:  "main.cpp"
absoluteFilePath:  "E:/qt_practice/main.cpp"
fileName:  "main.cpp"
exists:  true
suffix:  "cpp"
created:  "2017-08-28T09:32:21"
lastModified:  "2017-09-01T17:13:44"
owner:  "pengzhen"
permissions:  QFlags(0x10|0x40|0x100|0x200|0x400|0x1000|0x2000|0x4000)
对照 QFile::Permissions 可以看到,该 main.cpp 的权限为其他人不可访问、组内可读可执行、用户或所有者可读可写可执行,即 Linux 下的 750。
QDir
QDir 也使用正斜杠 / 作为其目录分隔符,并且支持相对路径,你可以使用其成员函数 isRelative() 或 isAbsolute() 来判断使用的路径的是相对的还是绝对的,你甚至可以使用成员函数 makeAbsolute 从一个相对路径得到一个绝对路径。
QDir 有一些类似 shell 命令行的函数,如 mkdir、rmdir、cd。
一些有用的静态成员函数:
| QDir | QString | 返回值 |
|---|---|---|
| current() | currentPath() | 当前工作目录 你可以使用 setCurrent 进行更改 |
| home() | homePath() | 当前用户目录 |
| root() | rootPath() | 根目录 |
| temp() | tempPath() | 系统临时文件夹 |
一些常用的非静态成员函数:
exists;isReadable;path;absolutePath;dirName;count:目录下的文件夹和文件总数;entryList:目录下的文件夹和文件名列表;entryInfoList:目录下的文件夹和文件信息列表;remove:删除文件;setFilter:文件类型过滤器,影响entryList和entryInfoList;setNameFilters:文件名过滤器,影响entryList和entryInfoList;setSorting:设置文件排序顺序,如按大小排列、按修改时间排列等,影响entryList和entryInfoList;
演示:
#include <QDir>
#include <QDebug>

int main(void)
{
	qDebug() << "currentPath: " << QDir::currentPath();
	qDebug() << "homePath: " << QDir::homePath();
	qDebug() << "rootPath: " << QDir::rootPath();
	qDebug() << "tempPath: " << QDir::tempPath();

	QDir dir(QDir::currentPath());
	qDebug() << "path: " << dir.path();
	qDebug() << "absolutePath: " << dir.absolutePath();
	qDebug() << "dirName: " << dir.dirName();
	qDebug() << "exists: " << dir.exists();
	qDebug() << "count: " << dir.count();

	qDebug() << "files: ";
	dir.setFilter(QDir::Files);
	dir.setSorting(QDir::Name | QDir::Reversed);
	for (const QString& file : dir.entryList())
	{
		qDebug() << " " << file;
	}

	dir.mkdir("dir");
	qDebug() << "after mkdir(dir): "
		<< "dir exists?: " << QDir("dir").exists();
	dir.cd("dir");
	qDebug() << "after cd(dir): " << dir.absolutePath();
	dir.cd("..");
	qDebug() << "after cd(..): " << dir.absolutePath();
	dir.rmdir("dir");
	qDebug() << "after rmdir(dir): "
		<< "dir exists?: " << QDir("dir").exists();
}
结果:
$ release\qt_practice.exe
currentPath:  "E:/qt_practice"
homePath:  "C:/Users/pengzhen"
rootPath:  "C:/"
tempPath:  "C:/Users/pengzhen/AppData/Local/Temp"
path:  "E:/qt_practice"
absolutePath:  "E:/qt_practice"
dirName:  "qt_practice"
exists:  true
count:  12
files:
  "test.txt"
  "qt_practice.pro"
  "main.cpp"
  "dirent.h"
  "Makefile.Release"
  "Makefile.Debug"
  "Makefile"
  ".qmake.stash"
after mkdir(dir):  dir exists?:  true
after cd(dir):  "E:/qt_practice/dir"
after cd(..):  "E:/qt_practice"
after rmdir(dir):  dir exists?:  false
为什么是12,因为包含了两个特殊文件夹 . 和 ..。
Qt 特性
标准 C++ 对象模型为对象范式(object paradigm)提供了非常有效的运行时支持,但它的静态性质在某些问题领域是不灵活的。图形用户界面编程不仅需要运行时的高效性,还需要高度的灵活性,Qt 通过将 C++ 的速度与 Qt 对象模型的灵活性相结合来提供这一点。
Qt 添加了这些功能到 C++ 中:
- 信号和槽: 一种强大的对象间通信机制;
- 对象属性: 提供可查询可设计的对象属性;
- 事件与事件过滤器;
- 国际化的字符串翻译机制;
- 定时器:可以在事件驱动的 GUI 中优化整合多个任务;
- 对象树: 分层可查询,使用一种很自然的方式组织对象所有权;
- 保护指针 QPointer: 当引用的对象被销毁时,被保护的指针被自动设置为 0;
- 元对象系统;
- 自定义类型创建。
这些 Qt 特性大多都是继承自 QObject,然后使用标准 C++ 技术实现的。像信号槽和对象属性这样的特性还需要元对象系统的支持。
元对象系统是一种 C++ 扩展,使得该语言更适合于真正的 GUI 编程。
信号和槽
信号和槽用于两个对象之间的通信,它是 Qt 的核心特征,也是区别于其它开发框架的突出特征。
在 GUI 编程中,当我们改变一个部件时,通常希望有另一个部件做出一些回应。举个简单的例子,当你点击窗口的关闭按钮时,通常希望执行窗口的 close 函数来关闭窗口。一些工具包如 Android,使用回调机制(callback)来处理这样的通信,虽然回调机制很快,但却有两个很大的缺陷:不直观、必须保证参数类型的正确性;而 Qt 使用信号槽机制来处理这样的通信,当一个事件发生时,如上面的按钮被点击,便发射一个信号到一个槽,这个槽就是一个函数,接着便执行这个槽函数,即上面的 close 函数。
- 信号槽机制是类型安全的:信号的函数签名必须与关联的槽的函数签名相匹配,实际上槽的函数签名可以短于信号的函数签名,多余的参数会被忽略;
- 信号槽机制还是松散耦合的:信号既不需要知道也不需要关心哪个槽会接收这个信号;
- 任何继承自 QObject 或其子类且声明了
Q_OBJECT宏的类都能使用信号槽机制; - 信号不能被定义,也不能有返回值,即只能是 void 类型;
- 槽函数可以被用来接收信号,但也可以被当做正常函数进行调用;
- 你可以将多个信号关接到同一个槽,也可以将多个槽关联到同一个信号(槽执行的顺序与关联顺序一致),你甚至可以将一个信号关联到另一个信号(这样当第一个信号被发射时,第二个信号也会被立即发射);
- 一个信号被关联多少次,当其被触发时,就会发射多少次,不管槽函数是否相同,除非你使用
Qt::UniqueConnection; - 当一个信号被发射时,其关联的槽默认会立即执行,但是你也可以在关联时设置不同的关联选项来决定是否立即执行;
- 当有多个信号关联到同一个槽时,可以使用
QObject::sender()或 QSignalMapper 来对不同的信号进行不同的处理; - 如果第三方库(如 boost)中有
signals、slots、emit关键字的话,就会与 Qt 关键字重复,为了解决这个问题,你可以在.pro文件中加上CONFIG += no_keywords来取消定义这三个关键字,转而使用Q_SIGNALS、Q_SLOTS和Q_EMIT宏。所以为了可扩展性,建议一致使用这三个大写的宏。
有多种关联信号和槽的 connect 函数,其中最常用的有三种:
另一种比较常用的信号槽连接方式是自动连接,只要你在构造时执行(该语句在 setupUi 中会自动执行):
QMetaObject::connectSlotsByName(this);
然后按如下命名规则命名槽函数,那么该槽函数就会根据自己的名字自动关联到相应的信号(其中 object name 可以通过 QObject::setObjectName 进行设置):
void on_<object name>_<signal name>(<signal parameters>);
在没学习常见的 Qt 组件之前,这里只做一个简单的演示:
// Test.h
#pragma once
#include <QObject>

class Test : public QObject
{
	Q_OBJECT

public:
	Test()
		: m_value(0)
	{}

	int value() const;

public Q_SLOTS:
	void setValue(int);

Q_SIGNALS:
	void valueChanged(int);

private:
	int m_value;
};

inline int Test::value() const
{
	return m_value;
}

inline void Test::setValue(int value)
{
	if (value != m_value) {
		m_value = value;
		Q_EMIT valueChanged(value);
	}
}
// main.cpp
#include <QDebug>

#include "Test.h"

int main(void)
{
	Test a, b;
	QObject::connect(&a, &Test::valueChanged, &b, &Test::setValue);

	qDebug() << "after init: ";
	qDebug() << "a: " << a.value();
	qDebug() << "b: " << b.value();

	a.setValue(1);
	qDebug() << "after a.setValue(1): ";
	qDebug() << "a: " << a.value();
	qDebug() << "b: " << b.value();

	b.setValue(2);
	qDebug() << "after b.setValue(2): ";
	qDebug() << "a: " << a.value();
	qDebug() << "b: " << b.value();
}
结果:
$ release\qt_practice.exe
after init:
a:  0
b:  0
after a.setValue(1):
a:  1
b:  1
after b.setValue(2):
a:  1
b:  2
对象属性
Qt 提供了类似于一些编译器供应商提供的复杂的属性系统,该属性系统基于元对象系统,并且支持信号槽。
要想声明一个属性,你只需在 QObject 的继承类中使用 Q_PROPERTY 即可:
Q_PROPERTY(type name(type name
           (READ getFunction (READ getFunction [WRITE setFunction] |
            MEMBER memberName [(READ getFunction READ getFunction | WRITE setFunction))])

           [RESET resetFunction]
           [NOTIFY notifySignal]
           [REVISION int]
           [DESIGNABLE boolbool]
           [SCRIPTABLE boolbool]
           [STORED boolbool]
           [USER boolbool]
           [CONSTANT]
           [FINAL])
举两个简单的例子:
Q_PROPERTY(bool focus READ hasFocus)
Q_PROPERTY(bool enabled READ isEnabled WRITE setEnabled)
Q_PROPERTY(QCursor cursor READ cursor WRITE setCursor RESET unsetCursor)
	Q_PROPERTY((QColor color MEMBER m_color NOTIFY colorChanged))
    Q_PROPERTY((qreal spacing MEMBER m_spacing NOTIFY spacingChanged))
    Q_PROPERTY(QString text MEMBER m_text NOTIFY textChanged)
    ...
Q_SIGNALS:
    void colorChanged();
    void spacingChanged();
    void textChanged(const QString &newText);

private:
    QColor  m_color;
    qreal   m_spacing;
    QString m_text;
乍一看,这个属性系统不就声明了一个成员变量嘛,看上去没什么软用,但其实声明的属性比常规的成员变量多了一些额外的访问特性:
- 当没有指定
MEMBER成员变量时,必须拥有一个READ访问函数,用来读取该属性; - 一个可选的
WRITE函数,用来设置属性的值,该函数只能拥有一个参数、且返回值必须为空; - 当没有指定
READ访问函数时,必须拥有一个关联MEMBER成员变量,这使得该成员变量变得可读可写(仅 QML)而不需要创建READ和WRITE函数; - 一个可选的
RESET重置函数,用以将该属性设置回默认值; - 一个可选的
NOTIFY信号,该信号对于MEMBER成员变量来说只能拥有至多一个参数,且参数的类型必须与该成员变量一致,发射时该参数的值就是该属性的最新值。当NOTIFY与MEMBER合并使用时,该信号在属性值发生变化时会自动发射;单独使用时必须指定一个当属性变化时会发射、且存在的信号; FINAL代表该属性不能被继承类重载;- 其它选项可以参考官方文档。
READ、WRITE、RESET 函数可以被继承,也可以是虚的,但多继承时只能继承自第一个父类。
Q_PROPERTY 声明的属性可以使用通用函数 QObject::property() 和 QObject::setProperty() 进行读写,只需知道该属性的名字即可:
// Test.h
#pragma once
#include <QString>
#include <QObject>

class Test : public QObject
{
	Q_OBJECT

	Q_PROPERTY(int value READ value WRITE setValue NOTIFY valueChanged)
	Q_PROPERTY(QString key READ key WRITE setKey NOTIFY keyChanged)
public:
	Test()
		: m_value(0), m_key("")
	{}

	int value() const;
	QString key() const;

public Q_SLOTS:
	void setValue(int);
	void setKey(const QString&);

Q_SIGNALS:
	void valueChanged(int);
	void keyChanged(const QString&);

private:
	int m_value;
	QString m_key;
};

inline int Test::value() const
{
	return m_value;
}

inline void Test::setValue(int value)
{
	if (value != m_value) {
		m_value = value;
		Q_EMIT valueChanged(value);
	}
}

inline QString Test::key() const
{
	return m_key;
}

inline void Test::setKey(const QString& key)
{
	if (key != m_key) {
		m_key = key;
		Q_EMIT keyChanged(key);
	}
}
// main.cpp
#include <QDebug>
#include <QMetaProperty>

#include "Test.h"

int main(void)
{
	Test t;
	QObject::connect(&t, &Test::valueChanged,
		[](int value) { qDebug() << "value changed: " << value; });
	QObject::connect(&t, &Test::keyChanged,
		[](const QString& str) { qDebug() << "key changed: " << str; });

	qDebug() << "after init:";
	qDebug() << "\tt.value: " << t.value();
	qDebug() << "\tt.key: " << t.property("key").toString();

	t.setValue(2);
	t.setProperty("key", "pengzhen");

	qDebug() << "after write:";
	qDebug() << "\tt.value: " << t.property("value").toInt();
	qDebug() << "\tt.key: " << t.key();

	qDebug() << "print all properties of t:";
	const QMetaObject *metaobject = t.metaObject();
	int count = metaobject->propertyCount();
	for (int i = 0; i<count; ++i) {
		QMetaProperty metaproperty = metaobject->property(i);
		const char *name = metaproperty.name();
		QVariant value = t.property(name);
		qDebug() << "\t" << name << ": " << value;
	}
}
结果:
$ release\qt_practice.exe
after init:
        t.value:  0
        t.key:  ""
value changed:  2
key changed:  "pengzhen"
after write:
        t.value:  2
        t.key:  "pengzhen"
print all properties of t:
         objectName :  QVariant(QString, "")
         value :  QVariant(int, 2)
         key :  QVariant(QString, "pengzhen")
可以看到,QObject 对象自带一个名为 objectName 的属性,该属性在自动信号槽连接时有用,可以通过 QObject::setObjectName 进行设置。
另外,QObject::setProperty() 还可以设置动态属性,即添加一个仅对当前对象有效的属性;如果你的属性类型是自定义类型的话,还需要使用 Q_DECLARE_METATYPE 进行声明之后才能用于属性系统。
事件系统
在 Qt 中,事件是一个对象,继承自抽象 QEvent 类,用以表示发生在应用程序内部的事情、或应用程序需要知道的外部活动的结果。它们可以被任何 QObject 或其子类的对象进行接收和处理,通常被用于 Qt 组件。
常见的事件如鼠标事件,分为单击、双击、移动等事件类型;又比如键盘事件,分为按下、释放等事件类型。这些事件类型都有在 QEvent::Type被定义,你可以通过不同的事件类型来快速的判断该事件的动态类型:
bool MyWidget::event(QEvent *event)
{
    if (event->type() == QEvent::KeyPress) {
        QKeyEvent *ke = static_cast<QKeyEvent *>(event);
        if (ke->key() == Qt::Key_Tab) {
            // special tab handling here
            return true;
        }
    } else if (event->type() == MyCustomEventType) {
        MyCustomEvent *myEvent = static_cast<MyCustomEvent *>(event);
        // custom event handling here
        return true;
    }

    return QWidget::event(event);
}
当一个事件发生后,Qt 构造一个合适的 QEvent 子类的对象来表示它,然后将其传递到一个特定的 QObject 或其子类的对象。
要想使 Qt 程序进入事件循环,即应用程序在运行时接收发生的各种事件,你必须调用 QCoreApplication::exec() 函数:
int QApplication::exec()
{
    return QGuiApplication::exec();
}

int QGuiApplication::exec()
{
#ifndef QT_NO_ACCESSIBILITY
    QAccessible::setRootObject(qApp);
#endif
    return QCoreApplication::exec();
}
所有事件都要通过 QCoreApplication::notify 函数进行发送,其返回值为接收对象处理该事件后的结果。当接收对象所属类对该事件不感兴趣时(返回值为 false),该事件会被传递到其父类进行处理。
处理事件的方法有五种:
- 重新实现 QWidget 的
paintEvent、mousePressEvent等特定事件处理函数,只对单个部件有效; - 重新实现
QCoreApplication::notify函数,这样能够对所有事件进行完全的控制,但同一时间只能处理一个事件; - 在 qApp 上安装一个或多个事件过滤器,这样能够处理所有组件的所有事件,且可以同时处理多个事件,但优先级比 notify 函数要低,且只能处理发生在主线程中的事件;
- 重新实现
QObject::event函数,该函数的优先级比特定事件处理函数的优先级高; - 在对象上安装事件过滤器,这样能够处理所有该对象的子对象事件。
实际编程中最常用的是第一种和第五种,因为方法二需要继承 QCoreApplication 且需要考虑诸多问题,方法三实现的全局事件过滤器会减缓事件的处理。
下面先来演示方法一四:
// myWidget.h
#pragma once
#include <QDebug>
#include <QEvent>
#include <QWidget> // QWidget 继承自 QObject
#include <QWheelEvent>
#include <QMouseEvent>

class myWidget : public QWidget
{
	Q_OBJECT

public:
	myWidget(QWidget *parent = 0)
		: QWidget(parent)
	{}

protected:
	// QObject::event
	bool event(QEvent*)	override;

	// QWidget::wheelEvent
	void wheelEvent(QWheelEvent*) override;

	// QWidget::mousePressEvent
	void mousePressEvent(QMouseEvent*) override;
};

inline bool myWidget::event(QEvent* e)
{
	if (e->type() == QEvent::Wheel) {
		QWheelEvent *we = static_cast<QWheelEvent *>(e);
		if (we->angleDelta().y() > 0) {
			qDebug() << "forward";
		}
		else {
			qDebug() << "backward";
		}
		return true; // 如果想让该事件继续被传递,返回 false
	}

	return QWidget::event(e); // QWidget::event 可能有些内部实现
}

inline void myWidget::wheelEvent(QWheelEvent* e)
{
	qDebug() << "wheelEvent called.";

	QWidget::wheelEvent(e);
}

inline void myWidget::mousePressEvent(QMouseEvent* e)
{
	qDebug() << "mousePressEvent called.";

	QWidget::mousePressEvent(e);
}
// main.cpp
#include <QApplication>
#include "myWidget.h"

int main(int argc, char *argv[])
{
	// QApplication 对象必须在创建与用户界面相关的任何其他对象之前被创建
	QApplication app(argc, argv);

	myWidget window;
	window.resize(250, 150);
	window.move(300, 300);
	window.setWindowTitle("event handlers");
	window.show();

	return app.exec(); // 开始事件循环
}
结果是一个名为 event handlers 的空白窗口:
$ qmake -project  # .pro 文件后手动加上 CONFIG += console 和 QT += widgets
$ qmake
$ mingw32-make
$ release\qt_practice.exe
backward
forward
mousePressEvent called.
可以看到,当前后滚动滚轮时,并没有打印 wheelEvent called.,说明 QObject::event 确实比特定事件处理函数更早获取事件。
我们再来实现方法五:
// mainWindow.h
#pragma once
#include <QMainWindow>
#include "myWidget.h"

class mainWindow : public QMainWindow
{
public:
	mainWindow(QWidget *parent = 0);

protected:
	bool eventFilter(QObject*, QEvent*) override;

private:
	myWidget *w;
};

mainWindow::mainWindow(QWidget *parent)
	: QMainWindow(parent)
{
	w = new myWidget();
	setCentralWidget(w); // 将 w 设在窗口中央

	w->installEventFilter(this); // 为 w 安装事件过滤器
}

bool mainWindow::eventFilter(QObject *obj, QEvent *event)
{
	if (obj == w)
	{
		if (event->type() == QEvent::Wheel) {
			qDebug() << "eventFilter: event is QWheelEvent.";
		}
		return false; // 继续传递该事件
	}
	else {
		return QMainWindow::eventFilter(obj, event);
	}
}
结果:
$ release\qt_practice.exe
eventFilter: event is QWheelEvent.
backward
eventFilter: event is QWheelEvent.
forward
mousePressEvent called.
可以看到,父对象的事件过滤器比子对象的事件过滤器更早获取到事件。
如果你想代码发送一个事件的话,使用 QCoreApplication::sendEvent 或 QCoreApplication::postEvent,它们的两个主要区别是:
sendEvent立即发送事件而postEvent会将事件添加到事件队列中等待调度处理;sendEvent的事件指针在事件处理完毕之后不会自行调用 delete,而postEvent会。
qApp
查看 qApp 的说明文档,我们知道 qApp 是一个全局指针,指向当前 application 实例。
// QCoreApplication.h
#define qApp QCoreApplication::instance()
static QCoreApplication *instance() { return self; }
static QCoreApplication *self;

// QGUIApplication.h
#if defined(qApp)
#undef qApp
#endif
#define qApp (static_cast<QGuiApplication *>(QCoreApplication::instance()))

// QApplication.h
#if defined(qApp)
#undef qApp
#endif
#define qApp (static_cast<QApplication *>(QCoreApplication::instance()))
国际化字符串
应用程序的国际化(internationalization)和本地化(localization)是应用程序适应不同语言、不同区域、和不同目标市场技术需求的过程。其中国际化是指应用程序不需要修改工程就能适应不同语言和区域;本地化是指将应用程序适应到一个特定的语言或区域。
Qt 支持现在使用的大多数语言,包括所有东亚语言(汉语、日语、韩语)、所有西方语言(使用拉丁字母)、阿拉伯语言等。所有 Qt 的输入部件和文本绘制方式都对这些语言提供了内置支持,Qt 内置的字体引擎可以在同一时间正确的绘制不同的文本,这些文本可以包含来自众多不同书写系统的字符。
你可以很容易的使用 Qt Linguist 工具来完成应用程序的翻译工作:
- 编写可以翻译的源代码;
- 在
.pro文件中指定生成的.ts文件名,如TRANSLATIONS = zh_CN.ts; - Qt 命令行执行
lupdate myproject.pro生成.ts文件; - 使用 Qt Linguist 对生成的
.ts文件进行翻译; - Qt 命令行执行
lrelease myproject.pro生成.qm文件; - 最后在创建部件之前使用该
.qm文件即可:
#include <QTranslator>
...
QApplication app(argc, argv);
QTranslator t;
t.load("zh_CN.qm");
qApp->installTranslator(&t);
...
其实一般使用的翻译函数就两个,tr() 和 QCoreApplication::translate,另外你还可以使用 QTextCodec 来转换各种编码,另外如数字、日期、时间等的本地化还需使用 QLocal,更多内容可以查看 http://doc.qt.io/qt-5/internationalization.html 。
定时器
如果你想周期性的执行某些任务时,在 C++11 里,代码很可能像下面这样:
#include <thread>
...
while (!done)
{
	std::this_thread::sleep_for(
		std::chrono::duration<double, std::milli>(sleep_time)
	);

	task();
}
...
当然我一开始没有想到线程的问题,不过 stackoverflow 总会给你一些不一样的灵感。
在 Qt 中,QObject 提供了基础的定时器支持:
- QObject::startTimer 开始一个定时器并返回该定时器 ID;
- 每当定时器事件到了,就会调用 QObject::timerEvent 虚函数,我们一般重新实现该函数来周期性的完成某项任务;
- 销毁定时器调用 QObject::killTimer。
// Test.h
#pragma once
#include <QDebug>
#include <QObject>
#include <QTimerEvent>

class Test : public QObject
{
	Q_OBJECT

public:
	Test(QObject *parent = 0);
	~Test();

protected:
	void timerEvent(QTimerEvent*) override;

private:
	int id[3];
};

inline Test::Test(QObject *parent)
	: QObject(parent)
{
	id[0] = startTimer(100); // 100 ms
	id[1] = startTimer(200); // 200 ms
	id[2] = startTimer(300); // 300 ms
}

inline Test::~Test()
{
	killTimer(id[0]);
	killTimer(id[1]);
	killTimer(id[2]);
}

inline void Test::timerEvent(QTimerEvent *e)
{
	int ID = e->timerId();
	if (ID == id[0]){
		qDebug() << "timer1: " << ID;
	}else if (ID == id[1]){
		qDebug() << "timer2: " << ID;
	}
	else {
		qDebug() << "timer3: " << ID;
	}
}
由于 QTimerEvent 是一个事件,所以必须开始事件循环:
// main.cpp
#include <QCoreApplication>
#include "Test.h"

int main(int argc, char *argv[])
{
	QCoreApplication app(argc, argv);

	Test t;

	return app.exec();
}
结果:
$ release\qt_practice.exe
timer1:  1
timer2:  2
timer1:  1
timer3:  3
timer1:  1
timer2:  2
timer1:  1
timer1:  1
timer2:  2
timer3:  3
timer1:  1
timer1:  1
timer2:  2
timer1:  1
^C
对于多线程应用程序,你可以使用 QTimer 来创建一个定时器,只要该线程具有事件循环。对于 GUI 应用,调用 QApplication::exec 就能使所有线程开始事件循环了,但是对于非 GUI 应用,你需要调用 QThread::exec 来使该线程进入事件循环。
你并不能在另一个线程开始一个当前线程中的定时器。
QTimer 演示:
// Test.h
#pragma once
#include <QDebug>
#include <QTimer>
#include <QObject>

class Test : public QObject
{
	Q_OBJECT

public:
	Test(QObject *parent = 0);

public Q_SLOTS:
	void update();

private:
	QTimer *timer;
};

inline Test::Test(QObject *parent)
	: QObject(parent)
{
	// 由于对象树特性,当 this 被销毁时,子对象也会被销毁
	// QTimer 的析构函数自动调用 stop()
	timer = new QTimer(this);
	timer->setInterval(1000); // 1s

	QObject::connect(timer, &QTimer::timeout, this, &Test::update);
	timer->start();
}

inline void Test::update()
{
	qDebug() << __func__;
}
结果:
$ release\qt_practice.exe
update
update
update
update
^C
可以看到,由于 QTimer 使用了信号槽机制,可能会更加方便。
对象树
Qt 使用对象树(object tree)来管理所有的 QObject 类及其子类的对象:当你创建一个 QObject 对象时,如果使用了其它的 QObject 对象作为该对象的父对象(parent),就像上面的 QTimer 一样,那么这个 QObject 对象就会被添加到父对象的 QObject::children() 列表中,这样当父对象被销毁时,这个 QObject 对象也会被销毁;你也可以手动销毁该子对象,之后该子对象会将自己从其父对象的对象树中移除。
不管你的 QObject 对象创建在堆(heap)上还是栈(stack)上,对象树都能正常工作:
// Test.h
#pragma once
#include <QDebug>
#include <QObject>

class myObject : public QObject
{
	Q_OBJECT

public:
	myObject(QObject *parent = 0)
		: QObject(parent)
	{
		static int i;
		num = ++i;
	}

	~myObject()
	{
		qDebug() << "delete " << num;
	}

private:
	int num;
};

class Test : public QObject
{
	Q_OBJECT

public:
	Test(QObject *parent = 0)
		: QObject(parent)
	{
		obj[0] = new myObject(this);
		obj[1] = new myObject(this);
		obj[2] = new myObject(this);
	}

private:
	myObject* obj[3];
};
// main.cpp
#include "Test.h"

int main()
{
	// object tree on stack
	Test t;
	qDebug() << t.children();

	// object tree on heap
	Test *pt = new Test();
	qDebug() << pt->children();
	delete pt;

	return 0;
}
结果:
$ release\qt_practice.exe
(myObject(0x3c7858), myObject(0x3c78e0), myObject(0x3c7940))
(myObject(0x3cbc38), myObject(0x3cbc68), myObject(0x3cbc80))
delete  4
delete  5
delete  6
delete  1
delete  2
delete  3
可以看到对象树在堆栈上都能很好的工作,但是为了方便,一般子对象建立在堆上,顶层对象建立在栈上。
由于对象树的销毁特性,也可能造成析构函数被多次调用的危险:
#include "Test.h"

int main()
{
	myObject obj0, obj1;

	obj0.setParent(&obj1);

	return 0;
}
很显然 obj0 的析构函数被调用了两次:
$ release\qt_practice.exe
delete  2
delete  1
delete  1
QObject: shared QObject was deleted directly. The program is malformed and may crash.
QPointer
QPointer 是一个模板,用来存储一个 QObject 类或其子类的对象的指针。
你可以像使用传统指针一样来使用 QPointer,只是当其存储的指针指向的对象被销毁后,该指针会被设为0。
QPointer 的另一个优点是:它能自动转换为 T*,这意味着你可以直接将其传递给参数为 T* 的函数而无需任何操作。
QPointer 在销毁时不会对指针指向的对象做任何操作:
#include <QPointer>
#include <QSharedPointer>
#include "Test.h"

int main()
{
	QPointer<myObject> obj0 = new myObject();
	QSharedPointer<myObject> obj1(new myObject());

	return 0;
}
结果:
$ release\qt_practice.exe
delete  2
QSharedPointer 与 std::shared_ptr 类似,在其生命周期结束且没有其它 QSharedPointer 对象引用其指针时,会自动销毁其存储的指针。介于标准智能指针比较通用,建议一律使用标准智能指针。
往后凡是普通 QObject 指针,建议使用 QPointer 来存储,这样就不会有使用悬挂指针的危险了。
元对象系统
查看 The Meta-Object System,我们知道所谓元对象系统,就是提供了对象间通信的信号和槽机制、运行时类别信息和动态属性的系统。
一个类要想获得元对象系统的优点,必须满足以下三个条件:
- 必须继承自 QObject,间接的、直接的均可;
- 必须在 private 部分声明
Q_OBJECT宏; - 必须使用元对象编译器(moc)提供必要的实现元对象特性的代码,其结果一般是一个以
moc开头的 cpp 文件,如E:\qt_practice\release\moc_Test.cpp。
// main.cpp
#include <QMetaObject>
#include "Test.h"

int main()
{
	myObject myobject;
	QObject *qobject = &myobject;

	qDebug() << "is inherits from QObject: "
		<< myobject.inherits("QObject");              // 是否继承自 QObject

	const QMetaObject *mobj = myobject.metaObject();  // 获取 obj 的元对象
	qDebug() << "class name: " << mobj->className();  // 打印 obj 所属类的类名

	// 动态类型转换,不需要 RTTI 的支持
	// 比 std::dynamic_cast 快
	if (qobject_cast<myObject *>(qobject)) {
		qDebug() << "qobject is a myObject pointer.";
	}

	return 0;
}
结果:
$ release\qt_practice.exe
is inherits from QObject:  true
class name:  myObject
qobject is a myObject pointer.
delete  1
可以看到,转换为 QMetaObject 对象后,就能方便的使用元对象系统的特性了,动态转换也是一个非常不错的工具。
GUI 基础
QApplication
QApplication 管理 GUI 应用的控制流和主要设置,它继承自 QGUIApplication,实现了一些基于 QWidget 的应用程序所需要的功能。
使用 Qt 的任何 GUI 应用,都需要一个 QApplication 对象,不管该应用有多少个窗口;对于非基于 QWidget 的 Qt 应用,可以使用 QGUIApplication 代替,因为 QGUIApplication 不依赖于 Qt 组件库。
一些 GUI 应用提供特殊的批处理模式,如根据提供的命令行参数执行相关任务而不能人工干预,在这种非 GUI 模式下,只需要实例化一个简单的 QCoreApplication 就足够了,这避免了不必要的图形用户界面所需资源的初始化,官方示例如下:
QCoreApplication* createApplication(int &argc, char *argv[])
{
	for (int i = 1; i < argc; ++i)
		if (!qstrcmp(argv[i], "-no-gui"))
			return new QCoreApplication(argc, argv);
	return new QApplication(argc, argv);
}

int main(int argc, char* argv[])
{
	QScopedPointer<QCoreApplication> app(createApplication(argc, argv));

	if (qobject_cast<QApplication *>(app.data())) {
		// start GUI version...
	}
	else {
		// start non-GUI version...
	}

	return app->exec();
}
QApplication 的主要责任有:
- 使用用户的桌面设置初始化应用;
- 执行事件处理;
- 解析常见的命令行参数,从而设置相应的内部状态;
- 定义应用的外观和感觉;
- 指定应用如何分配颜色;
- 字符串的本地化;
- 提供了一些神奇的实例,如
desktop()和clipboard(); - 掌控所有窗口的部件位置;
- 管理应用的鼠标光标处理;
由于 QApplication 做了这么多初始化,所以它必须在创建与用户界面相关的任何其他对象之前被创建。
基础窗口部件 QWidget
QWidget 是所有用户界面对象的基类,其继承自 QObject 和 QPaintDevice,QDialog、QMainWindow、QLabel、QPushButton、QListWidget 等都是它的子类。
查看其公有构造函数:
explicit QWidget(QWidget* parent = Q_NULLPTR, Qt::WindowFlags f = Qt::WindowFlags());
- 当不传入参数或传入的第一个参数为空时,表示该部件是一个窗口,也被称为顶层部件(top-level widget),顶层部件可以使用成员函数
setWindowTitle来设置标题栏、setWindowIcon来设置窗口图标; - 当传入的第一个参数不为空时,表示该部件是传入参数的一个子部件,由于对象树特性,当父部件被删除时,所有该父部件的子部件都将被删除。
当你为一个可视部件添加一个子部件时,要想子部件变得可见,你必须显式调用其成员函数 show()。
第二个参数指定部件的各种窗口系统属性,其默认值已适应大多数部件,你可以查看 Qt::WindowFlags 了解各种标志的意义。
查看 QMainWindow 和 QDialog 的公有构造函数:
QMainWindow::QMainWindow(QWidget *parent, Qt::WindowFlags flags)
    : QWidget(*(new QMainWindowPrivate()), parent, flags | Qt::Window)
{
    d_func()->init();
}

QDialog::QDialog(QWidget *parent, Qt::WindowFlags f)
    : QWidget(*new QDialogPrivate, parent,
              f | ((f & Qt::WindowType_Mask) == 0 ? Qt::Dialog : Qt::WindowType(0)))
{
}
由于它们分别指定了 Qt::Window 和 Qt::Dialog 作为 Qt::WindowFlags 的默认值,并且分别在自己的窗口类型的基础上添加了相应的功能,所以 QMainWindow 和 QDialog 的各种子类是 Qt 中最常用的顶层部件类型。
QWidget 包含相当多的功能和属性,其中包含大量的事件处理虚函数,这意味着你可以重新实现它们以完成自定义功能:
protected:
    // Event handlers
    bool event(QEvent *event) Q_DECL_OVERRIDE;
    virtual void mousePressEvent(QMouseEvent *event);
    virtual void mouseReleaseEvent(QMouseEvent *event);
    virtual void mouseDoubleClickEvent(QMouseEvent *event);
    virtual void mouseMoveEvent(QMouseEvent *event);
#if QT_CONFIG(wheelevent)
    virtual void wheelEvent(QWheelEvent *event);
#endif
    virtual void keyPressEvent(QKeyEvent *event);
    virtual void keyReleaseEvent(QKeyEvent *event);
    virtual void focusInEvent(QFocusEvent *event);
    virtual void focusOutEvent(QFocusEvent *event);
    virtual void enterEvent(QEvent *event);
    virtual void leaveEvent(QEvent *event);
    virtual void paintEvent(QPaintEvent *event);
    virtual void moveEvent(QMoveEvent *event);
    virtual void resizeEvent(QResizeEvent *event);
    virtual void closeEvent(QCloseEvent *event);
#ifndef QT_NO_CONTEXTMENU
    virtual void contextMenuEvent(QContextMenuEvent *event);
#endif
#if QT_CONFIG(tabletevent)
    virtual void tabletEvent(QTabletEvent *event);
#endif
#ifndef QT_NO_ACTION
    virtual void actionEvent(QActionEvent *event);
#endif

#ifndef QT_NO_DRAGANDDROP
    virtual void dragEnterEvent(QDragEnterEvent *event);
    virtual void dragMoveEvent(QDragMoveEvent *event);
    virtual void dragLeaveEvent(QDragLeaveEvent *event);
    virtual void dropEvent(QDropEvent *event);
#endif

    virtual void showEvent(QShowEvent *event);
    virtual void hideEvent(QHideEvent *event);
    virtual bool nativeEvent(const QByteArray &eventType, void *message, long *result);

    // Misc. protected functions
    virtual void changeEvent(QEvent *);
启动界面 QSplashScreen
有时候你的 GUI 应用在启动时非常耗时,这时就需要一个启动界面来表示程序正在启动。很多图形界面都会有一个启动界面,比如你最常用的 Windows、Linux、Visual Studio、以及你正在学习的 Qt Creator。
QSplashScreen 提供了启动界面的功能,它实现的启动界面位于屏幕中心:
#include <QMainWindow>
#include <QApplication>
#include <QSplashScreen>

#include <thread>    // sleep_for

int main(int argc, char *argv[])
{
	QApplication a(argc, argv);

	QPixmap pixmap("welcome.jpg");
	QSplashScreen splash(pixmap);
	splash.show();

	splash.showMessage("Load module 1"); // 显示一些字符串信息
	std::this_thread::sleep_for(
		std::chrono::duration<double, std::milli>(2000)  // 2s
	);

	splash.showMessage("Load module 2");
	std::this_thread::sleep_for(
		std::chrono::duration<double, std::milli>(2000)  // 2s
	);

	QMainWindow window;
	window.resize(250, 150);
	window.move(300, 300);
	window.setWindowTitle("QMainWindow");
	window.show();

	splash.finish(&window); // 待 window 显示之后关闭 splash
	return a.exec();
}
如果你想自定义启动界面的话,重新实现 QSplashScreen::drawContents 虚函数。
对话框 QDialog
QDialog 是所有对话框窗口的基类,所谓对话框窗口,就是一个经常用来完成一个短小任务、或与用户进行简单交互的顶层窗口。
按照运行对话框时是否会阻塞该应用程序的其它窗口,对话框被分为模态的(modal)和非模态的(modeless)。
模态对话框会阻塞其所属应用程序的其它可见窗口(即只能与该对话框进行交互)。模态对话框还被划分为应用模态(application modal)或窗口模态(window modal)两种类型,其中应用模态是模态窗口的默认类型。所谓应用模态,即该对话框会阻塞其所属应用程序的所有其它窗口,窗口模态只阻塞与该对话框关联的窗口(即其父窗口)。
实现模态对话框最简单的方式就是调用 QDialog::exec,由于模态对话框经常被用于获取用户点击按钮的结果,所以 exec 会返回一个 QDialog::DialogCode 结果,用以表明用户是点击了 OK 还是 Cancel。如果你想获取其它结果,你可以使用信号槽机制关联到 QDialog::accepted 或 QDialog::rejected,或者继承并自定义信号传递相关信息。
另一个实现模态对话框的方式是使用 QWidget::setWindowModality,但是只对不可见的窗口有效。
非模态对话框不会阻塞其它窗口,其实现方式只需要调用 QWidget::show 即可,该函数立即返回控制权到调用者。
如果你在调用 show 之后移动了该对话框,然后你又隐藏了该对话框,当你再次调用 show 函数时,该对话框会显示在原来的位置,如果你想再次显示在移动后的位置,就需要在窗口关闭事件 QWidget::closeEvent 中保存移动后的位置,然后在调用 show 函数之前将窗口移动到该位置。
QDialog 有两个默认的按键功能,Enter 键和 Esc 键。当你按下 Enter 键时,如果有默认按钮(使用 QPushButton::setDefault 设置),那么会触发该按钮;当你按下 Esc 键时,会触发 QDialog::rejected 信号。
一般默认的按钮会有额外的框显示在按钮周围,这时你还可以按下空格键来触发点击事件,这是 QPushButton 的父类 QAbstractButton::keyPressEvent 实现的。
我们常用的对话框一般是消息对话框、错误消息对话框、输入对话框、文件对话框、进度对话框、颜色对话框、字体对话框和向导对话框,它们在 Qt 中分别是 QMessageBox、QErrorMessage、QInputDialog、QFileDialog、QProcessDialog、QColorDialog、QFontDialog 和 QWizard,它们全都继承自 QDialog。
消息对话框 QMessageBox
QMessageBox 提供一个模态对话框,用来通知用户一些消息、或者向用户提出一个问题并获取答案,你可以很快速的查看 QMessageBox 并获取其使用方式:
#include <QDebug>
#include <QMessageBox>
#include <QApplication>
int main(int argc, char *argv[])
{
QApplication a(argc, argv);
QMessageBox msgBox;
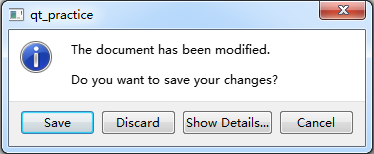
msgBox.setIcon(QMessageBox::Information); // 设置图标
msgBox.setText("The document has been modified."); // 消息文本
msgBox.setInformativeText("Do you want to save your changes?"); // 更多描述
msgBox.setDetailedText("\n\ndetail text\n\n"); // 详细信息,提供一个 Show Details... 按钮
msgBox.setStandardButtons(QMessageBox::Save | QMessageBox::Discard | QMessageBox::Cancel);
msgBox.setDefaultButton(QMessageBox::Save); // 设置默认按钮,按 Enter 键时触发
msgBox.setEscapeButton(QMessageBox::Cancel); // 设置退出按钮,按 Esc 键时触发
int ret = msgBox.exec();
switch (ret) {
case QMessageBox::Save:
qDebug() << "Save";
break;
case QMessageBox::Discard:
qDebug() << "Discard";
break;
case QMessageBox::Cancel:
qDebug() << "Cancel";
break;
default:
break;
}
}
比较简单的使用方式就是使用其静态函数,这样更加快速,但失去了灵活性。一共有四种类型–information、question、warning 和 critical,它们的接口一样,只是图标不同:
int ret = QMessageBox::information(0, QMessageBox::tr("My Application"),     // 标题
				QMessageBox::tr("The document has been modified.\n"
					"Do you want to save your changes?"),// 信息文本
				QMessageBox::Save | QMessageBox::Discard
				| QMessageBox::Cancel,                       // 按键
				QMessageBox::Save);                          // 默认按键
错误消息对话框 QErrorMessage
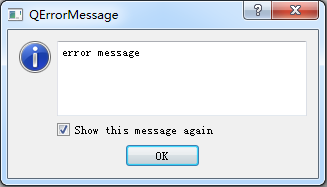
QErrorMessage 提供一个显示错误信息的非模态对话框,该对话框包含一个文本标签组件、一个复选框组件和一个 OK 按钮,其中文本标签组件用来显示错误信息、复选框组件用来控制是否显示相同的错误信息。
#include <QDebug>
#include <QApplication>
#include <QErrorMessage>

int main(int argc, char *argv[])
{
	QApplication a(argc, argv);

	QErrorMessage dialog;
	dialog.setWindowTitle("QErrorMessage");
	dialog.showMessage("error message");

	return a.exec();
}
输入对话框 QInputDialog
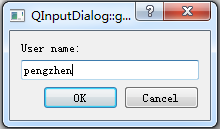
QInputDialog 提供一个模态对话框,用来从用户那里获取一个单一的值,这个值可以是一个数字、一个字符串或者列表中的某个项目。
你可以方便的使用其静态函数 getText、getMultiLineText、getInt、getDouble 和 getItem 来获取不同的值,它们的使用方式都一样:
#include <QDir>
#include <QDebug>
#include <QApplication>
#include <QInputDialog>

int main(int argc, char *argv[])
{
	QApplication a(argc, argv);

	bool ok;
    QString text = QInputDialog::getText(0,                                          // 父组件
					QInputDialog::tr("QInputDialog::getText()"), // 标题
					QInputDialog::tr("User name:"),              // 输入提示
					QLineEdit::Normal,                           // 文本显示类型
					QDir::home().dirName(),                      // 默认值
					&ok);                                        // 用户是否确认
    if (ok && !text.isEmpty())
        qDebug() << text;
}
文件对话框 QFileDialog
QFileDialog 提供一个模态对话框,用来让用户选择文件或目录,你可以使用其方便的静态函数来快速的得到一个或多个文件或目录的名字或路径:
static QString getOpenFileName(QWidget *parent = Q_NULLPTR,
				const QString &caption = QString(),
				const QString &dir = QString(),
				const QString &filter = QString(),
				QString *selectedFilter = Q_NULLPTR,
				Options options = Options());

static QUrl getOpenFileUrl(QWidget *parent = Q_NULLPTR,
				const QString &caption = QString(),
				const QUrl &dir = QUrl(),
				const QString &filter = QString(),
				QString *selectedFilter = Q_NULLPTR,
				Options options = Options(),
				const QStringList &supportedSchemes = QStringList());

static QString getSaveFileName(QWidget *parent = Q_NULLPTR,
				const QString &caption = QString(),
				const QString &dir = QString(),
				const QString &filter = QString(),
				QString *selectedFilter = Q_NULLPTR,
				Options options = Options());

static QUrl getSaveFileUrl(QWidget *parent = Q_NULLPTR,
				const QString &caption = QString(),
				const QUrl &dir = QUrl(),
				const QString &filter = QString(),
				QString *selectedFilter = Q_NULLPTR,
				Options options = Options(),
				const QStringList &supportedSchemes = QStringList());

static QString getExistingDirectory(QWidget *parent = Q_NULLPTR,
					const QString &caption = QString(),
					const QString &dir = QString(),
					Options options = ShowDirsOnly);

static QUrl getExistingDirectoryUrl(QWidget *parent = Q_NULLPTR,
					const QString &caption = QString(),
					const QUrl &dir = QUrl(),
					Options options = ShowDirsOnly,
					const QStringList &supportedSchemes = QStringList());

static QStringList getOpenFileNames(QWidget *parent = Q_NULLPTR,
					const QString &caption = QString(),
					const QString &dir = QString(),
					const QString &filter = QString(),
					QString *selectedFilter = Q_NULLPTR,
					Options options = Options());

static QList<QUrl> getOpenFileUrls(QWidget *parent = Q_NULLPTR,
					const QString &caption = QString(),
					const QUrl &dir = QUrl(),
					const QString &filter = QString(),
					QString *selectedFilter = Q_NULLPTR,
					Options options = Options(),
					const QStringList &supportedSchemes = QStringList());
演示:
#include <QDir>
#include <QDebug>
#include <QString>
#include <QFileDialog>
#include <QApplication>

int main(int argc, char *argv[])
{
	QApplication a(argc, argv);

	QStringList filenames = QFileDialog::getOpenFileNames(0,                          // 父组件
					QFileDialog::tr("QFileDialog"),                   // 标题
					QDir::currentPath(),                              // 默认打开目录
					QFileDialog::tr("header (*.h);;source (*.cpp)")); // 文件名过滤器

	qDebug() << filenames;
}
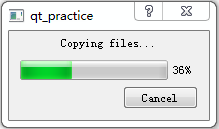
进度对话框 QProcessDialog
QProcessDialog 提供一个可选但一般设置为模态的对话框,用来显示一个耗时较长的操作进度:
#include <QDebug>
#include <QApplication>
#include <QProgressDialog>

#include <thread>  // sleep_for

int main(int argc, char *argv[])
{
	QApplication a(argc, argv);

	int numFiles = 100;
	QProgressDialog progress("Copying files...",   // 进度描述
				"Cancel",              // 按钮名
				0,                     // 进度条最小值
				numFiles);             // 进度条最大值
	progress.setWindowModality(Qt::WindowModal);
	progress.show();

	for (int i = 0; i < numFiles; i++) {
		progress.setValue(i);
		QApplication::processEvents();      // 由于还没有开始事件循环,所以需要周期性处理事件

		if (progress.wasCanceled())
			break;

		std::this_thread::sleep_for(
			std::chrono::duration<double, std::milli>(1000)); // 耗时操作
	}
	progress.setValue(numFiles);
}
非模态进度对话框实现查看 QProcessDialog。
颜色对话框 QColorDialog
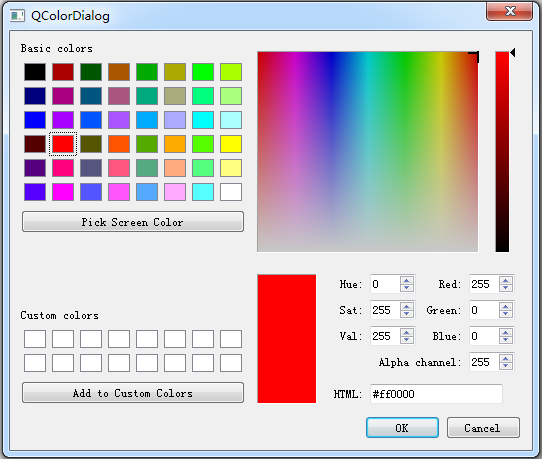
QColorDialog 提供一个模态对话框,用来获取一个指定的颜色。
#include <QDebug>
#include <QApplication>
#include <QColorDialog>

int main(int argc, char *argv[])
{
	QApplication a(argc, argv);

	QColor color = QColorDialog::getColor(Qt::red,  // 默认颜色
		0,                                      // 父组件
		QColorDialog::tr("QColorDialog"),       // 标题
		QColorDialog::ShowAlphaChannel);        // 是否显示 alpha 选项

	qDebug() << color;
}
字体对话框 QFontDialog
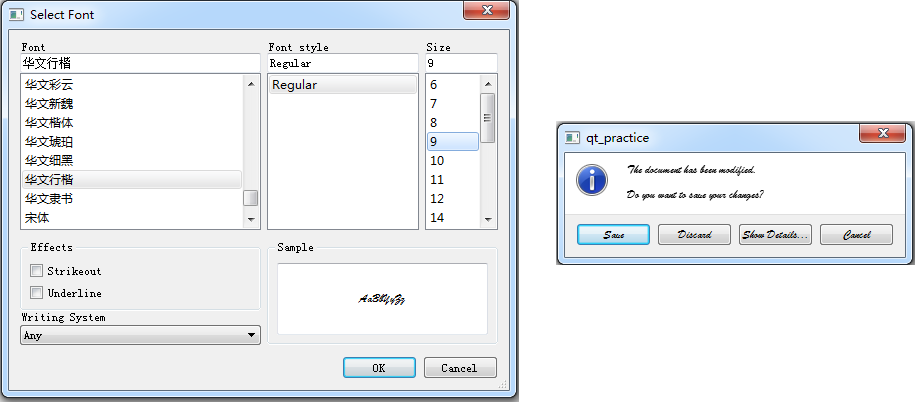
QFontDialog 提供一个模态对话框,用来获取一个指定的字体。
#include <QDebug>
#include <QMessageBox>
#include <QFontDialog>
#include <QApplication>

int main(int argc, char *argv[])
{
	QApplication a(argc, argv);

	bool ok; // 用户是否确认
	QFont font = QFontDialog::getFont(&ok);

	QMessageBox msgBox;
	msgBox.setIcon(QMessageBox::Information);                       // 设置图标
	msgBox.setText("The document has been modified.");              // 消息文本
	msgBox.setInformativeText("Do you want to save your changes?"); // 更多描述
	msgBox.setDetailedText("\n\ndetail text\n\n");                  // 详细信息,提供一个 Show Details... 按钮
	msgBox.setStandardButtons(QMessageBox::Save | QMessageBox::Discard | QMessageBox::Cancel);
	msgBox.setDefaultButton(QMessageBox::Save);                     // 设置默认按钮,按 Enter 键时触发
	msgBox.setEscapeButton(QMessageBox::Cancel);                    // 设置退出按钮,按 Esc 键时触发
	if (ok) { msgBox.setFont(font); }
	msgBox.exec();
	// return a.exec();
}
向导对话框 QWizard
QWizard 提供一个模态对话框,用以引导用户一步一步完成某个操作。
你可以使用 QWizardPage 来创建一个向导页面,然后使用 QWizard::addPage 将其添加到 QWizard 对象中,你可以参考官方文档来设计向导页面。
#include <QDebug>
#include <QWizard>
#include <QWizardPage>
#include <QApplication>

int main(int argc, char *argv[])
{
	QApplication a(argc, argv);

	QWizardPage *page1 = new QWizardPage();
	QWizardPage *page2 = new QWizardPage();
	QWizardPage *page3 = new QWizardPage();

	page1->setTitle("page1");
	page2->setTitle("page2");
	page3->setTitle("page3");

	QWizard wizard;
	wizard.addPage(page1);
	wizard.addPage(page2);
	wizard.addPage(page3);

	wizard.setWindowTitle("QWizard");
	wizard.exec();
}

主程序窗口 QMainWindow
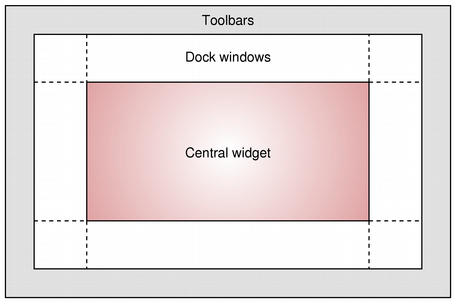
QMainWindow 包含菜单栏(QMenuBar)、工具栏(QToolBar)、Dock 部件(QDockWidget)、中心部件(Central Widget)和状态栏(QStatusBar)五个部件:
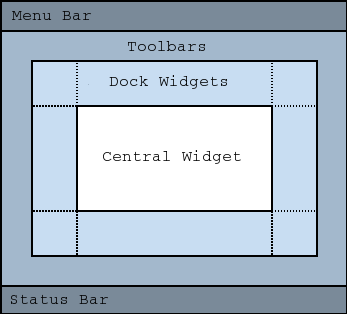
其中中心部件是应用程序的主要功能实现区域,一个 QMainWindow 实例只能拥有一个中心部件,你可以使用 setCentralWidget 来设置这个中心部件。
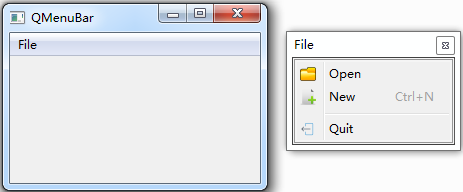
QMenuBar
Qt 使用 QMenu 来实现单个菜单,然后使用 QMenuBar 来将这些菜单联合起来,形成一个水平的菜单栏。
当 QMainWindow 实例的 QMenuBar 不存在时,调用 QMainWindow::menuBar() 会创建并返回一个空的以该 QMainWindow 实例为父对象的菜单栏,否则返回已存在的 QMenuBar。当然,如果你想创建一个独立的菜单栏,可以使用 QMainWindow::setMenuBar。
QMenuBar 会自动将自己放置在其父对象的最上方,并随着父对象 size 的变化而变化。
一个菜单包含一个操作选项(action item)列表,该列表垂直排列,每个操作选项可以拥有一个文本标签、位于左侧的图标和一个快捷键,它可以是位于菜单栏的下拉菜单、也可以是点击右键或某个特定按钮出现的独立上下文菜单。QMenu 还支持撕下菜单(tear-off menu),撕下菜单是一个顶层窗口,它是对应菜单的一个拷贝,如果对这种菜单有所需求的话,一般将其实现为 QToolBar。
操作列表(action item)包含四种类型:分割线(separator)、子菜单(QMenu)、部件(QWidgetAction)或触发某个命令的操作(QAction)。其中 QWidgetAction 继承自 QAction,你可以继承并重新实现 QWidgetAction::createWidget 或使用 QWidgetAction::setDefaultWidget(QWidget*),然后再使用 QMenu::addAction(QAction*) 添加一个自定义组件到某个菜单;QAction 包含图标(QIcon)、菜单文本(menu text)、快捷键(shortcut)、状态栏文本(status text)、”What’s this” 文本和工具提示文本(tooltip),这些内容都可以使用如下函数进行设置:
void setIcon(const QIcon &icon);
void setText(const QString &text);
void setShortcut(const QKeySequence &shortcut);
void setStatusTip(const QString &statusTip);
void setWhatsThis(const QString &what);
void setToolTip(const QString &tip);
你可以使用如下函数来对 QMenuBar 进行操作:
QAction *addAction(const QString &text);
QAction *addAction(const QString &text, const QObject *receiver, const char* member);
QAction *addMenu(QMenu *menu);
QMenu *addMenu(const QString &title);
QMenu *addMenu(const QIcon &icon, const QString &title);
QAction *addSeparator();
QAction *insertSeparator(QAction *before);
QAction *insertMenu(QAction *before, QMenu *menu);
void clear();
你也可以使用如下函数来对 QMenu 进行操作:
QAction *addMenu(QMenu *menu);
QMenu *addMenu(const QString &title);
QMenu *addMenu(const QIcon &icon, const QString &title);
QAction *addSeparator();
QAction *insertMenu(QAction *before, QMenu *menu);
QAction *insertSeparator(QAction *before);
void addAction(QAction *action);
void addActions(QList<QAction*> actions);
void insertActions(QAction *before, QList<QAction*> actions);
void insertAction(QAction *before, QAction *action);
void removeAction(QAction *action);
QList<QAction*> actions() const;
void clear();
// 使能撕下菜单
void setTearOffEnabled(bool);
// 要想QMenu可见,必须调用popup或exec而不是show
void popup(const QPoint &pos, QAction *at = Q_NULLPTR);
QAction *exec();
QAction *exec(const QPoint &pos, QAction *at = Q_NULLPTR);
我们一般会使用 Alt 加一个字母键来快速打开某个菜单、或者使用 Ctrl 加某些键来快速执行某个操作,你可以分别通过在字符串名中使用 & 加一个字母来设置菜单 Alt 快捷键、使用 QAction::setShortcut(const QKeySequence &shortcut) 来设置动作快捷键。
如果同一个菜单中多个 QAction 只能选择其中一个的话,可以将这些 QAction 放置在同一个 QActionGroup 中,这些 QAction 还是像普通 QAction 一样添加到该菜单中,不过为了方便使用,通常会将这些 QAction 放置在一起、添加一个 separator、并为该 separator 命名。
一个简单的菜单栏示例如下:
// myWidget.h
#pragma once
#include <QIcon>
#include <QDebug>
#include <QCursor>
#include <QAction>
#include <QMenuBar>
#include <QMouseEvent>
#include <QMainWindow>
#include <QKeySequence>
#include <QApplication>

class myWidget :public QMainWindow
{
	Q_OBJECT

private:
	QMenu *menu;

	// 右键菜单
	void mousePressEvent(QMouseEvent* event) override;
public:
	myWidget(QWidget *parent = 0)
		: QMainWindow(parent)
	{
		QAction *openAction = new QAction();
		openAction->setIcon(QIcon("open.png"));
		openAction->setText(tr("&Open"));
		openAction->setToolTip(tr("open"));
		connect(openAction, &QAction::triggered, [] {qDebug() << "open"; });

		QAction *newAction = new QAction(QIcon("new.png"), "&New");
		newAction->setToolTip(tr("new"));
		newAction->setShortcut(QKeySequence("CTRL+N"));
		connect(newAction, &QAction::triggered, this, &myWidget::newActionClicked);

		QAction *quitAction = new QAction();
		quitAction->setIcon(QIcon("quit.png"));
		quitAction->setText(tr("&Quit"));
		quitAction->setToolTip(tr("quit"));
		connect(quitAction, &QAction::triggered, qApp, &QApplication::quit);

		menu = menuBar()->addMenu(QString("&File"));
		menu->setTearOffEnabled(true);
		menu->setToolTipsVisible(true);
		menu->addAction(openAction);
		menu->addAction(newAction);
		menu->addAction(quitAction);
		menu->insertSeparator(quitAction);
	}

private Q_SLOTS:
	void newActionClicked()
	{
		qDebug() << "new";
	}
};

inline void myWidget::mousePressEvent(QMouseEvent* event)
{
	if (event->button() == Qt::RightButton)
	{
		if (menu) {
			menu->exec(QCursor::pos());
		}
	}
}
#include "myWidget.h"

int main(int argc, char *argv[]) {

	QApplication app(argc, argv);

	myWidget window;
	window.resize(250, 150);
	window.move(300, 300);
	window.setWindowTitle("QMenuBar");
	window.show();

	return app.exec();
}
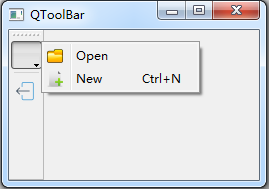
QToolBar
Qt 使用 QToolBar 来实现工具栏,所谓工具栏,就是包含一系列控制的可移动面板。
QToolBar 也是用 QAction 来实现各种控制,但是与 QMenu 不同,QToolBar 没有 addMenu 或 insertMenu 函数,但是它有 addWidget 和 insertWidget 函数,这意味着你可以显式向工具栏里添加各种部件,但是如果你的 QToolBar 不是 QMainWindow 的子部件的话,你就不能使用它们,你只能像 QMenu 一样使用 QWidgetAction。
默认工具栏是可以在工具栏区域(上下左右)移动的,你也可以使用 setMovable 来禁用这个功能,或者 setAllowedAreas 来设置可移动的区域。当工具栏项目太多导致工具栏无法全部显示时,工具栏会自动在最后面显示一个扩展按钮,点击该扩展按钮,将会弹出一个菜单显示没有在工具栏里显示的项目。
由于 QToolBar 很多特性都是基于 QMainWindow 的,所以如果你要使用 QToolBar 的话,建议一致使用 QMainWindow。
// myWidget.h
#pragma once
#include <QIcon>
#include <QMenu>
#include <QDebug>
#include <QString>
#include <QToolBar>
#include <QToolButton>
#include <QMainWindow>
#include <QKeySequence>
#include <QApplication>

class myWidget :public QMainWindow
{
	Q_OBJECT

public:
	myWidget(QWidget *parent = 0)
		: QMainWindow(parent)
	{
		QAction *openAction = new QAction();
		openAction->setIcon(QIcon("open.png"));
		openAction->setText(tr("&Open"));
		openAction->setToolTip("open");
		connect(openAction, &QAction::triggered, [] {qDebug() << "open"; });

		QAction *newAction = new QAction(QIcon("new.png"), "&New");
		newAction->setToolTip(tr("new"));
		newAction->setShortcut(QKeySequence("CTRL+N"));
		connect(newAction, &QAction::triggered, this, &myWidget::newActionClicked);

		QAction *quitAction = new QAction();
		quitAction->setIcon(QIcon("quit.png"));
		quitAction->setText(tr("&Quit"));
		quitAction->setToolTip(tr("quit"));
		quitAction->setShortcut(QKeySequence("CTRL+Q"));
		connect(quitAction, &QAction::triggered, qApp, &QApplication::quit);

		QMenu *fileMenu = new QMenu();
		fileMenu->addAction(openAction);
		fileMenu->addAction(newAction);
		fileMenu->setToolTipsVisible(true);

		QToolButton *toolBtn = new QToolButton();
		toolBtn->setIcon(QIcon("file.png"));
		toolBtn->setMenu(fileMenu);
		//toolBtn->setPopupMode(QToolButton::MenuButtonPopup); // 立即显示菜单

		QToolBar *toolbar = addToolBar("toolbar");
		toolbar->addWidget(toolBtn);
		toolbar->addAction(quitAction);
		toolbar->insertSeparator(quitAction);
		//toolbar->setMovable(false);
	}

private Q_SLOTS:
	void newActionClicked()
	{
		qDebug() << "new";
	}
};
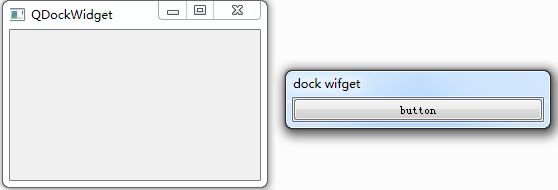
QDockWidget
Dock 部件是一个窗口,它由一个标题栏和一个内容区(content area)组成,你可以将其停靠在中心部件(Central Widget)的四周,也可以单独作为一个顶级窗口。
Dock 部件的标题栏包含一个窗口标题、一个悬浮按钮和一个关闭按钮,内容区需要使用 setWidget 来设置你想设置的组件。
你可以通过 setFeatures 来设置是否允许悬浮、关闭、或移动,你还可以使用 setAllowedAreas 来设置可以停靠的区域。
// myWidget.h
#pragma once
#include <QDebug>
#include <QString>
#include <QPushButton>
#include <QDockWidget>
#include <QMainWindow>
#include <QApplication>

class myWidget :public QMainWindow
{
	Q_OBJECT

public:
	myWidget(QWidget *parent = 0)
		: QMainWindow(parent)
	{
		QDockWidget *dock = new QDockWidget(tr("dock wifget"));
		dock->setAllowedAreas(Qt::LeftDockWidgetArea | Qt::RightDockWidgetArea);
		dock->setFeatures(QDockWidget::DockWidgetMovable | QDockWidget::DockWidgetFloatable);

		QPushButton *pushBtn = new QPushButton(tr("button"));
		connect(pushBtn, &QPushButton::clicked, [] {qDebug() << "QPushButton clicked."; });
		dock->setWidget(pushBtn);

		addDockWidget(Qt::RightDockWidgetArea, dock);
	}
};
QStatusBar
状态栏是一个水平条,用来显示状态信息,它被分为如下三类:
- 临时信息:一般用作提示,一段时间后消失,使用
showMessage来显示,一般在最左边; - 常规信息:显示页数、行号等,会被临时信息覆盖,使用
addWidget来显示,一般在最左边; - 常驻信息:显示版本号、日期等,使用
addPermanentWidget来显示,一般在最右边。
当 QMainWindow 实例的 QStatusBar 不存在时,调用 QMainWindow::statusBar() 会创建并返回一个空的状态栏,否则返回已存在的 QStatusBar。
// myWidget.h
#pragma once
#include <QDebug>
#include <QLabel>
#include <QStatusBar>
#include <QMainWindow>
#include <QApplication>

class myWidget :public QMainWindow
{
	Q_OBJECT

public:
	myWidget(QWidget *parent = 0)
		: QMainWindow(parent)
	{
		QLabel *common = new QLabel(tr("common"));
		QLabel *permanent = new QLabel(tr("permanent"));

		QStatusBar *statusbar = statusBar();
		statusbar->addWidget(common);
		statusbar->addPermanentWidget(permanent);
		statusbar->showMessage(tr("temporary"), 2000); // 2s
	}
};
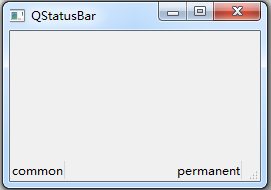
常用小部件
GUI常用的小部件无非按钮、文本框、标签、下拉框、复选框、滚动条等等,在Qt中,按钮用 QPushButton 实现、文本框分为 QTextEdit(大型文本)和 QLineEdit(行文本)以及 QPlainTextEdit(纯文本)、标签用 QLabel 实现、下拉框分为 QComboBox 和 QSpinBox 以及 QDoubleSpinBox、复选框用 QCheckBox 实现、滚动条分为 QSlider 和 QScrollBar。
这些小部件非常简单:
// myWidget.h
#pragma once
#include <QLabel>
#include <QSlider>
#include <QSpinBox>
#include <QComboBox>
#include <QCheckBox>
#include <QTextEdit>
#include <QLineEdit>
#include <QPushButton>
#include <QPlainTextEdit>

#include <QMenu>
#include <QDebug>
#include <QPixmap>
#include <QMenuBar>
#include <QStatusBar>
#include <QStringList>
#include <QMainWindow>
#include <QApplication>

class myWidget :public QMainWindow
{
	Q_OBJECT

private:
	void createMenu();

private Q_SLOTS:
	void showLabel();
	void showSlider();
	void showSpinBox();
	void showComboBox();
	void showCheckBox();
	void showTextEdit();
	void showLineEdit();
	void showPushButton();
	void showPlainTextEdit();

public:
	myWidget(QWidget *parent = 0)
		: QMainWindow(parent)
	{
		createMenu();
	}
};

inline void myWidget::createMenu()
{
	QMenu *menu = menuBar()->addMenu(QString("&Widgets"));
	menu->addAction(tr("QLabel"), this, &myWidget::showLabel);
	menu->addAction(tr("QSlider"), this, &myWidget::showSlider);
	menu->addAction(tr("QSpinBox"), this, &myWidget::showSpinBox);
	menu->addAction(tr("QComboBox"), this, &myWidget::showComboBox);
	menu->addAction(tr("QCheckBox"), this, &myWidget::showCheckBox);
	menu->addAction(tr("QTextEdit"), this, &myWidget::showTextEdit);
	menu->addAction(tr("QLineEdit"), this, &myWidget::showLineEdit);
	menu->addAction(tr("QPushButton"), this, &myWidget::showPushButton);
	menu->addAction(tr("QPlainTextEdit"), this, &myWidget::showPlainTextEdit);
}

inline void myWidget::showLabel()
{
	QLabel *tmp = new QLabel(tr("QLabel"));
	tmp->setPixmap(QPixmap("welcome.png"));

	setCentralWidget(tmp);
	statusBar()->showMessage(tr("QLabel"), 2000);
}

inline void myWidget::showSlider()
{
	QSlider *tmp = new QSlider(Qt::Horizontal);
	tmp->setRange(0, 100);
	tmp->setSingleStep(10);
	tmp->setSliderPosition(50);
	connect(tmp, &QSlider::valueChanged, [](int pos) {qDebug() << pos; });

	setCentralWidget(tmp);
	statusBar()->showMessage(tr("QSlider"), 2000);
}

inline void myWidget::showSpinBox()
{
	QSpinBox *tmp = new QSpinBox();
	tmp->setRange(0, 100);
	tmp->setWrapping(true); // 循环
	tmp->setValue(1);
	tmp->setSingleStep(2);
	connect(tmp, static_cast<void(QSpinBox::*)(int)>(&QSpinBox::valueChanged),
		[](int i) {qDebug() << i; });

	setCentralWidget(tmp);
	statusBar()->showMessage(tr("QSpinBox"), 2000);
}

inline void myWidget::showComboBox()
{
	QComboBox *tmp = new QComboBox();
	QStringList strList{ tr("str0"),tr("str1"),tr("str2"),tr("str3") };
	tmp->addItems(strList);
	tmp->setCurrentIndex(2);
	connect(tmp, static_cast<void(QComboBox::*)(const QString &)>(&QComboBox::currentIndexChanged),
		[](const QString &str) {qDebug() << str; });

	setCentralWidget(tmp);
	statusBar()->showMessage(tr("QComboBox"), 2000);
}

inline void myWidget::showCheckBox()
{
	QCheckBox *tmp = new QCheckBox(tr("QCheckBox"));
	connect(tmp, &QCheckBox::stateChanged,
		[](int state) {qDebug() << (state ? tr("true") : tr("false")); });

	setCentralWidget(tmp);
	statusBar()->showMessage(tr("QCheckBox"), 2000);
}

inline void myWidget::showTextEdit()
{
	QTextEdit *tmp = new QTextEdit(tr("QTextEdit"));
	connect(tmp, &QTextEdit::textChanged, [] {qDebug() << tr("text changed."); });

	setCentralWidget(tmp);
	statusBar()->showMessage(tr("QTextEdit"), 2000);
}

inline void myWidget::showLineEdit()
{
	QLineEdit *tmp = new QLineEdit(tr("QLineEdit"));
	connect(tmp, &QLineEdit::editingFinished, [] {qDebug() << tr("edit finished."); });

	setCentralWidget(tmp);
	statusBar()->showMessage(tr("QLineEdit"), 2000);
}

inline void myWidget::showPushButton()
{
	QPushButton *tmp = new QPushButton(tr("QPushButton"));
	connect(tmp, &QPushButton::clicked, [] {qDebug() << tr("QPushButton clicked."); });

	setCentralWidget(tmp);
	statusBar()->showMessage(tr("QPushButton"), 2000);
}

inline void myWidget::showPlainTextEdit()
{
	QPlainTextEdit *tmp = new QPlainTextEdit(tr("QPlainTextEdit"));
	connect(tmp, &QPlainTextEdit::textChanged, [] {qDebug() << tr("text changed."); });

	setCentralWidget(tmp);
	statusBar()->showMessage(tr("QPlainTextEdit"), 2000);
}
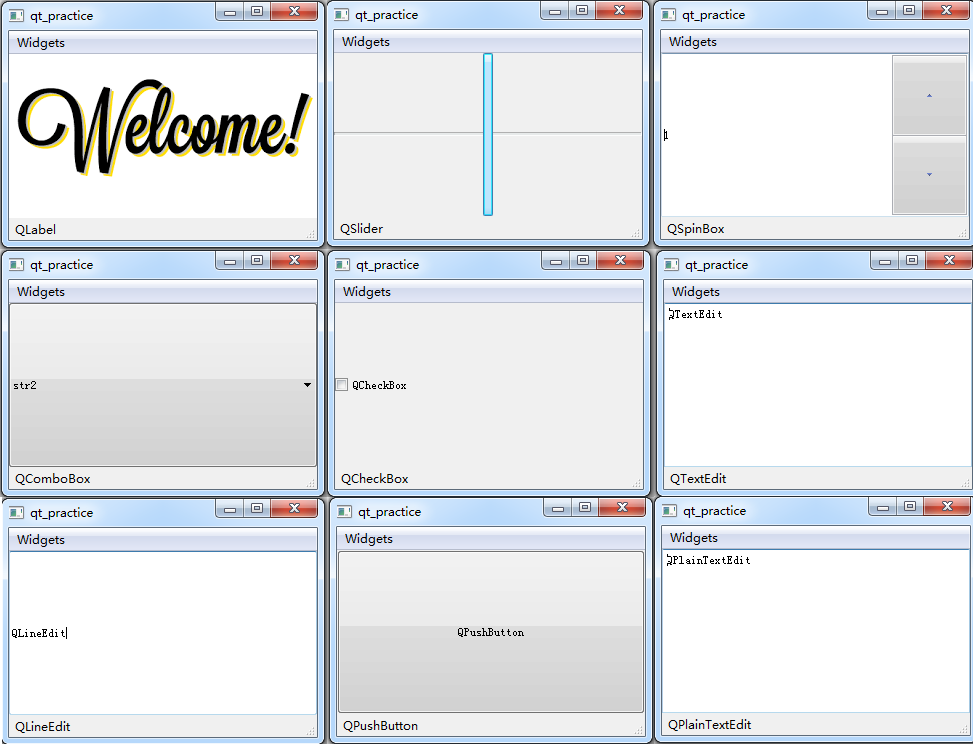
进度条 QProgressBar
QProgressBar 是Qt中用来显示进度的组件,其使用非常简单,只要设置好最小最大值,然后再设置当前值即可。一个简单的示例如下:
#include <QProgressBar>
#include <QApplication>

int main(int argc, char *argv[]) {

	QApplication app(argc, argv);

	QProgressBar bar;
	bar.setRange(0, 100);
	bar.setValue(50);
	bar.show();

	return app.exec();
}
优秀的gui应用都是立即响应的,这意味着当用户做完某个操作时,可以立即做下一个操作。如果某个操作特别耗时,应用就会卡住,所以一般耗时的操作都是交给另一个线程去做的,主线程只需要显示操作的进度即可。
Qt 中的线程类是 QThread,你可以参照官网进行简单的使用:
class WorkerThread : public QThread
{
	Q_OBJECT
	void run() Q_DECL_OVERRIDE {
		QString result;
		/* ... here is the expensive or blocking operation ... */
		emit resultReady(result);
	}
signals:
	void resultReady(const QString &s);
};

void MyObject::startWorkInAThread()
{
	WorkerThread *workerThread = new WorkerThread(this);
	connect(workerThread, &WorkerThread::resultReady, this, &MyObject::handleResults);
	connect(workerThread, &WorkerThread::finished, workerThread, &QObject::deleteLater);
	workerThread->start();
}
由于 QThread 的实例是在主线程,run 函数是在新线程,我们的进度条也是在主线程,所以 QProgressBar 实例应该在主线程创建,run 函数要想改变进度值,只能使用指针来实现,所以工作线程大体应该长这样:
#pragma once
#include <thread> // slepp_for
#include <QThread>
#include <QPointer>
#include <QProgressBar>

class WorkerThread :public QThread
{
	Q_OBJECT

private:
	QPointer<QProgressBar> mProgressBar;

	void run() override
	{
		if (mProgressBar) {
			Q_EMIT begin();
			std::this_thread::sleep_for(std::chrono::duration<double, std::milli>(2000));
			mProgressBar->setValue(10);
			std::this_thread::sleep_for(std::chrono::duration<double, std::milli>(5000));
			mProgressBar->setValue(70);
			std::this_thread::sleep_for(std::chrono::duration<double, std::milli>(3000));
			mProgressBar->setValue(100);
			std::this_thread::sleep_for(std::chrono::duration<double, std::milli>(500));
			Q_EMIT end();
		}
	}

public:
	WorkerThread(QProgressBar* const w, QObject *parent = Q_NULLPTR)
		:QThread(parent), mProgressBar(w)
	{}

Q_SIGNALS:
	void begin();
	void end();
};
我们来测试一下:
#include <QApplication>
#include "WorkerThread.h"

int main(int argc, char *argv[]) {

	QApplication app(argc, argv);

	QProgressBar window;
	window.resize(250, 20);
	window.move(300, 300);
	window.setWindowTitle("QProgressBar");
	window.show();

	WorkerThread *pro = new WorkerThread(&window);
	QObject::connect(pro, &WorkerThread::end, &window, &QProgressBar::close);
	QObject::connect(pro, &QThread::finished, pro, &QObject::deleteLater);
	pro->start();

	return app.exec();
}
结果:
$ release\qt_practice.exe
QObject::setParent: Cannot set parent, new parent is in a different thread
QObject::setParent: Cannot set parent, new parent is in a different thread
可以看到输出 warning,这是因为你不能在一个线程中绘制另一个线程中的组件,显然调用 setValue 会重新绘制 QProgressBar,所以必须想办法让绘制这个操作在主线程中进行。能不能用事件系统来达到这个目的呢?
由于 QThread 只有两个信号–started 和 finished,所以我们再添加一个信号 update,并添加一个 value 信息,用于传递进度值:
#pragma once
#include <thread> // slepp_for
#include <QThread>

class WorkerThread :public QThread
{
	Q_OBJECT

private:
	void run() override
	{
		Q_EMIT begin();
		std::this_thread::sleep_for(std::chrono::duration<double, std::milli>(2000));
		update(10);
		std::this_thread::sleep_for(std::chrono::duration<double, std::milli>(5000));
		update(70);
		std::this_thread::sleep_for(std::chrono::duration<double, std::milli>(3000));
		update(100);
		std::this_thread::sleep_for(std::chrono::duration<double, std::milli>(500));
		Q_EMIT end();
	}

Q_SIGNALS:
	void begin();
	void update(int value);
	void end();
};
修改 main.cpp:
#include <QProgressBar>
#include <QApplication>

#include "WorkerThread.h"

int main(int argc, char *argv[]) {

	QApplication app(argc, argv);

	QProgressBar window;
	window.resize(250, 20);
	window.move(300, 300);
	window.setWindowTitle("QProgressBar");
	window.show();

	WorkerThread *pro = new WorkerThread();
	QObject::connect(pro, &WorkerThread::update, &window, &QProgressBar::setValue);
	QObject::connect(pro, &WorkerThread::end, &window, &QProgressBar::close);
	QObject::connect(pro, &QThread::finished, pro, &QObject::deleteLater);
	pro->start();

	return app.exec();
}

结果没有任何问题,同时工作线程也显得特别干净,这正是我们想要的。
部件管理
如果要将多个部件整合到一起,就需要学会部件管理。
部件管理分为布局管理、部件容器、模型/视图(model/view)架构三种,依照不同需求进行使用。
窗口几何布局
QWidget 是所有用户界面对象的基类,其提供如下函数用于处理窗口的几何布局:
- 包含框架:
x()、y()、frameGeometry()、pos()、move(); - 不含框架:
geometry()、width()、height()、rect()、size()。

对于子组件来说,其没有框架。
// mainWindow.h
#pragma once
#include <QDebug>
#include <QMainWindow>

class mainWindow : public QMainWindow
{
	void moveEvent(QMoveEvent*) override
	{
		qDebug() << "pos: " << pos();
		qDebug() << "rect: " << rect();
		qDebug() << "geometry: " << geometry();
		qDebug() << "frameGeometry: " << frameGeometry();
		qDebug() << "x: " << x() << "y: " << y();
		qDebug() << "width: " << width() << "height: " << height();
	}
};
// main.cpp
#include "mainWindow.h"
#include <QApplication>

int main(int argc, char *argv[]) {

	QApplication app(argc, argv);

	mainWindow window;
	window.resize(250, 200);
	window.move(300, 300);
	window.setWindowTitle("geometry");
	window.show();

	return app.exec();
}
结果:
$ release\qt_practice.exe
pos:  QPoint(300,300)
rect:  QRect(0,0 250x200)
geometry:  QRect(300,300 250x200)
frameGeometry:  QRect(292,270 266x238)
x:  292 y:  270
width:  250 height:  200
布局管理
所谓布局管理,就是管理部件的位置和大小。
Qt 提供了五种布局方式:垂直布局(QVBoxLayout)、水平布局(QHBoxLayout)、网格布局(QGridLayout)、表单布局(QFormLayout)和堆栈布局(QStackedLayout)。其中表单布局由输入型控件和关联的标签组成,其布局就像你注册账号时的表单差不多,左边一列标签,右边一列输入;堆栈布局即只能显示其中一个部件的布局。
垂直水平布局
QVBoxLayout 和 QHBoxLayout 都是 QBoxLayout 的子类,它们只是分别在构造时强制了项目排列的方向,QVBoxLayout 是 TopToBottom、QHBoxLayout 是 LeftToRight,所以如果你想布置一个水平或者垂直的布局,你也可以直接使用 QBoxLayout,其支持的排列方向包括:
enum Direction { LeftToRight, RightToLeft, TopToBottom, BottomToTop,
				Down = TopToBottom, Up = BottomToTop };
QBoxLayout 可以添加四种项目:
addWidget,insertWidget:添加一个部件,可以指定拉伸因子和摆放位置,注意这个摆放位置与排列方向有很大关系;addSpacing,insertSpacing:添加一个不可拉伸的空间;addStretch,insertStretch:添加一个可拉伸的空项目;addLayout,insertLayout:添加一个子布局。
如果你想要移除布局中某个部件,你可以使用成员函数 removeWidget,或者你也可以调用 QWidget::hide() 来隐藏(且不占用绘制空间)这个插件直到 QWidget::show() 被调用。
#pragma once
#include <QLabel>
#include <QWidget>
#include <QLineEdit>
#include <QVBoxLayout>
#include <QHBoxLayout>

// 做一个表单,注意不能继承QMainWindow
// https://stackoverflow.com/questions/18947375/qt-compiler-complains-when-invoking-setlayout-on-my-mainwindow
class myWidget :public QWidget
{
	Q_OBJECT

public:
	myWidget(QWidget *parent = 0)
		: QWidget(parent)
	{
		QVBoxLayout *vbox = new QVBoxLayout();

		QHBoxLayout *hbox1 = new QHBoxLayout();
		QHBoxLayout *hbox2 = new QHBoxLayout();
		QHBoxLayout *hbox3 = new QHBoxLayout();

		QLabel *label1 = new QLabel(tr("label1"));
		QLabel *label2 = new QLabel(tr("label2"));
		QLabel *label3 = new QLabel(tr("label3"));

		QLineEdit *lineEdit1 = new QLineEdit(tr("lineEdit1"));
		QLineEdit *lineEdit2 = new QLineEdit(tr("lineEdit2"));
		QLineEdit *lineEdit3 = new QLineEdit(tr("lineEdit3"));

		hbox1->addWidget(label1);
		hbox1->addWidget(lineEdit1);
		hbox2->addWidget(label2);
		hbox2->addWidget(lineEdit2);
		hbox3->addWidget(label3);
		hbox3->addWidget(lineEdit3);

		vbox->addLayout(hbox1);
		vbox->addLayout(hbox2);
		vbox->addLayout(hbox3);

		setLayout(vbox);

		label3->hide();
	}
};

网格布局
QGridLayout 与 QBoxLayout 类似,你可以使用 addWidget、addLayout 或 addItem 来添加部件或子布局并指定行列位置和行列大小,你还可以使用 removeWidget 彻底删除某个部件或使用 QWidget::hide() 来隐藏(但不占用绘制空间)某个部件。
#pragma once
#include <QLabel>
#include <QWidget>
#include <QString>
#include <QTextEdit>
#include <QLineEdit>
#include <QCheckBox>
#include <QGridLayout>

class myWidget :public QWidget
{
	Q_OBJECT

public:
	myWidget(QWidget *parent = 0)
		: QWidget(parent)
	{
		QGridLayout *gl = new QGridLayout();

		for (int i = 0; i < 3; ++i)
		{
			QCheckBox *checkBox = new QCheckBox();
			QLabel *label = new QLabel();
			QLineEdit *lineEdit = new QLineEdit();

			QString num = QString::number(i);
			checkBox->setCheckState(Qt::Unchecked);
			checkBox->setText(tr("checkBox") + num);
			label->setText(tr("label") + num);
			lineEdit->setText(tr("lineEdit") + num);

			gl->addWidget(checkBox, i, 0);
			gl->addWidget(label, i, 1);
			gl->addWidget(lineEdit, i, 2);
		}

		// 在(3,0)位置添加一个4行3列的textEdit
		QTextEdit *textEdit = new QTextEdit(tr("QTextEdit"));
		gl->addWidget(textEdit, 3, 0, 4, 3);

		setLayout(gl);
	}
};
表单布局
QFormLayout 只有两列,它最初被设计出来就是为了写表单用的,其表单与 QGridLayout 设计出来的表单相比,其左右两列具有一一对应的关系,如果你在标签列设置了快捷键,那么快捷键会使光标跳到对应的右侧组件上,另外使用 QFormLayout 会比使用 QGridLayout 制作表单更为方便(代码量更小)。
你可以使用如下函数对 QFormLayout 进行操作:
void addRow(QWidget *label, QWidget *field);
void addRow(QWidget *label, QLayout *field);
void addRow(const QString &labelText, QWidget *field);
void addRow(const QString &labelText, QLayout *field);
void addRow(QWidget *widget);
void addRow(QLayout *layout);

void insertRow(int row, QWidget *label, QWidget *field);
void insertRow(int row, QWidget *label, QLayout *field);
void insertRow(int row, const QString &labelText, QWidget *field);
void insertRow(int row, const QString &labelText, QLayout *field);
void insertRow(int row, QWidget *widget);
void insertRow(int row, QLayout *layout);

void removeRow(int row);
void removeRow(QWidget *widget);
void removeRow(QLayout *layout);
简单示例:
#pragma once
#include <QWidget>
#include <QSpinBox>
#include <QLineEdit>
#include <QFormLayout>

class myWidget :public QWidget
{
	Q_OBJECT

public:
	myWidget(QWidget *parent = 0)
		: QWidget(parent)
	{
		QLineEdit *nameLineEdit = new QLineEdit(tr("name"));
		QLineEdit *emailLineEdit = new QLineEdit(tr("email"));
		QSpinBox  *ageSpinBox = new QSpinBox();
		ageSpinBox->setRange(0, 200);
		ageSpinBox->setWrapping(true); // 循环

		QFormLayout *formLayout = new QFormLayout();
		formLayout->addRow(tr("&Name:"), nameLineEdit);  // Alt + N
		formLayout->addRow(tr("&Email:"), emailLineEdit);// Alt + E
		formLayout->addRow(tr("&Age:"), ageSpinBox);     // Alt + A
		setLayout(formLayout);
	}
};

堆栈布局
QStackedLayout 同一时间只能显示其中一个部件,一般与 QComboBox 或其它单选部件合并使用:
#pragma once
#include <QWidget>
#include <QComboBox>
#include <QTextEdit>
#include <QVBoxLayout>
#include <QStackedLayout>

class myWidget :public QWidget
{
	Q_OBJECT

public:
	myWidget(QWidget *parent = 0)
		: QWidget(parent)
	{
		QComboBox *pageComboBox = new QComboBox();
		pageComboBox->addItem(tr("Page 1"));
		pageComboBox->addItem(tr("Page 2"));
		pageComboBox->addItem(tr("Page 3"));

		QTextEdit *textEdit1 = new QTextEdit(tr("Page 1"));
		QTextEdit *textEdit2 = new QTextEdit(tr("Page 2"));
		QTextEdit *textEdit3 = new QTextEdit(tr("Page 3"));

		QStackedLayout *stackedLayout = new QStackedLayout();
		stackedLayout->addWidget(textEdit1);
		stackedLayout->addWidget(textEdit2);
		stackedLayout->addWidget(textEdit3);

		connect(pageComboBox, SIGNAL(activated(int)),
			stackedLayout, SLOT(setCurrentIndex(int)));

		QVBoxLayout *mainLayout = new QVBoxLayout();
		mainLayout->addWidget(pageComboBox);
		mainLayout->addLayout(stackedLayout);
		setLayout(mainLayout);
	}
};
部件容器
部件容器是为了让一些部件组合在一起,并且拥有一些共有的属性,常用的如 QFrame、QToolBox、QGroupBox、QMdiArea、QScrollArea 等,这些类都非常简单:
#pragma once
#include <QFrame>
#include <QToolBox>
#include <QGroupBox>
#include <QMdiArea>
#include <QScrollArea>

#include <QMenu>
#include <QBrush>
#include <QLabel>
#include <QString>
#include <QPixmap>
#include <QMenuBar>
#include <QTextEdit>
#include <QStatusBar>
#include <QVBoxLayout>
#include <QMainWindow>
#include <QMessageBox>
#include <QRadioButton>

class widgetContainers :public QMainWindow
{
	Q_OBJECT
private:
	void createMenu();

private Q_SLOTS:
	void showFrame();
	void showToolBox();
	void showGroupBox();
	void showMdiArea();
	void showScrollArea();

public:
	widgetContainers(QWidget *parent = 0)
		: QMainWindow(parent)
	{
		createMenu();
	}
};

inline void widgetContainers::createMenu()
{
	QMenu *menu = menuBar()->addMenu(QString("&Containers"));
	menu->addAction(tr("QFrame"), this, &widgetContainers::showFrame);
	menu->addAction(tr("QToolBox"), this, &widgetContainers::showToolBox);
	menu->addAction(tr("QGroupBox"), this, &widgetContainers::showGroupBox);
	menu->addAction(tr("QMdiArea"), this, &widgetContainers::showMdiArea);
	menu->addAction(tr("QScrollArea"), this, &widgetContainers::showScrollArea);
}

inline void widgetContainers::showFrame()
{
	// QFrame 提供了一个框架
	QTextEdit *textEdit = new QTextEdit();
	QVBoxLayout *vbox = new QVBoxLayout();
	vbox->addWidget(textEdit);

	QFrame *tmp = new QFrame();
	tmp->setLineWidth(2);
	tmp->setMidLineWidth(0);
	tmp->setFrameStyle(QFrame::Panel | QFrame::Plain);
	tmp->setLayout(vbox);

	setCentralWidget(tmp);
	statusBar()->showMessage(tr("QFrame"), 2000);
}

inline void widgetContainers::showToolBox()
{
	// QToolBox 继承自 QFrame,支持多个标签页
	QTextEdit *textEdit1 = new QTextEdit(tr("textEdit1"));
	QTextEdit *textEdit2 = new QTextEdit(tr("textEdit2"));
	QTextEdit *textEdit3 = new QTextEdit(tr("textEdit3"));

	QToolBox *tmp = new QToolBox();
	tmp->addItem(textEdit1, tr("page1"));
	tmp->addItem(textEdit2, tr("page2"));
	tmp->addItem(textEdit3, tr("page3"));

	setCentralWidget(tmp);
	statusBar()->showMessage(tr("QToolBox"), 2000);
}

inline void widgetContainers::showGroupBox()
{
	// QGroupBox 为其组件设置了一个标题
	QRadioButton *radio1 = new QRadioButton(tr("&Radio button 1")); // Alt + r
	QRadioButton *radio2 = new QRadioButton(tr("R&adio button 2")); // Alt + a
	QRadioButton *radio3 = new QRadioButton(tr("Ra&dio button 3")); // Alt + d
	radio1->setChecked(true);

	QVBoxLayout *vbox = new QVBoxLayout();
	vbox->addWidget(radio1);
	vbox->addWidget(radio2);
	vbox->addWidget(radio3);
	vbox->addStretch(1);

	QGroupBox *tmp = new QGroupBox(tr("QGroupBox"));
	tmp->setLayout(vbox);
	tmp->setCheckable(true);

	setCentralWidget(tmp);
	statusBar()->showMessage(tr("QGroupBox"), 2000);
}

inline void widgetContainers::showMdiArea()
{
	// QMdiArea 支持多个子窗口
	// 通常被用作 QMainWindow 的中心部件
	QMessageBox *msgBox1 = new QMessageBox();
	QMessageBox *msgBox2 = new QMessageBox();
	QMessageBox *msgBox3 = new QMessageBox();

	msgBox1->setText("QMessageBox1");
	msgBox2->setText("QMessageBox2");
	msgBox3->setText("QMessageBox3");

	QMdiArea *tmp = new QMdiArea();
	tmp->addSubWindow(msgBox1);
	tmp->addSubWindow(msgBox2);
	tmp->addSubWindow(msgBox3);
	tmp->setTabsMovable(true);
	tmp->setTabsClosable(true);
	tmp->setBackground(QBrush(Qt::yellow));

	setCentralWidget(tmp);
	statusBar()->showMessage(tr("QMdiArea"), 2000);
}

inline void widgetContainers::showScrollArea()
{
	// QScrollArea 提供一个可滚动视图
	QLabel *imageLabel = new QLabel();
	imageLabel->setPixmap(QPixmap("big_image.jpg"));

	QScrollArea *tmp = new QScrollArea();
	tmp->setWidget(imageLabel);
	tmp->setBackgroundRole(QPalette::Dark);

	setCentralWidget(tmp);
	statusBar()->showMessage(tr("QScrollArea"), 2000);
}
模型/视图(model/view)
查看 Model/View Programming,如果你学过Android的话,应该知道MVC设计模式–应用的所有对象分为三类:
- 模型(model)对象:存储数据与业务逻辑。不关心用户界面,它存在的唯一目的就是存储和管理应用数据;
- 视图(view)对象:凡是能够在屏幕上看见的对象,就是视图对象。视图对象知道如何在屏幕上绘制自己以及如何响应用户输入;
- 控制器(controller)对象:视图对象与模型对象的联系纽带,响应由视图对象触发的各种事件,以及管理模型对象与视图层间的数据流动。
如果将视图对象与控制器对象合并,其结果就是模型/视图(model/view)架构。很明显,模型/视图架构可以使用不同的视图来表示相同的数据。
有关模型/视图的底层知识有些难懂,但是 Qt 实现了一些基于模型/视图的便捷类–QListWidget、QTreeWidget 和 QTableWidget。之所以称它们为便捷类,是因为它们用起来非常方便,但是它们没有将模型与视图分离,仅适用于少量数据的存储和显示;它们也被称为视图类,但是它们使用默认的模型来存储数据;由于它们使用 item 来添加数据,所以又被称为基于项目的视图类。
有关模型/视图的底层知识,我们将在高级篇进行讲解。
#pragma once
#include <QListWidget>
#include <QTreeWidget>
#include <QTableWidget>

#include <QIcon>
#include <QMenu>
#include <QString>
#include <QMenuBar>
#include <QStatusBar>
#include <QStringList>
#include <QMainWindow>

class itemBasedViews :public QMainWindow
{
	Q_OBJECT
private:
	void createMenu();

private Q_SLOTS:
	void showListWidget();
	void showTreeWidget();
	void showTableWidget();

public:
	itemBasedViews(QWidget *parent = 0)
		: QMainWindow(parent)
	{
		createMenu();
	}
};

inline void itemBasedViews::createMenu()
{
	QMenu *menu = menuBar()->addMenu(QString("&Views"));
	menu->addAction(tr("QListWidget"), this, &itemBasedViews::showListWidget);
	menu->addAction(tr("QTreeWidget"), this, &itemBasedViews::showTreeWidget);
	menu->addAction(tr("QTableWidget"), this, &itemBasedViews::showTableWidget);
}

inline void itemBasedViews::showListWidget()
{
	// QListWidget 提供一个列表视图
	QListWidgetItem *item1 = new QListWidgetItem();
	QListWidgetItem *item2 = new QListWidgetItem();
	QListWidgetItem *item3 = new QListWidgetItem();

	item1->setText(tr("file"));
	item1->setIcon(QIcon("file.png"));
	item2->setText(tr("new"));
	item2->setIcon(QIcon("new.png"));
	item3->setText(tr("open"));
	item3->setIcon(QIcon("open.png"));

	QListWidget *tmp = new QListWidget();
	tmp->addItem(item1);
	tmp->addItem(item2);
	tmp->addItem(item3);
	tmp->sortItems(Qt::AscendingOrder); // 升序

	setCentralWidget(tmp);
	statusBar()->showMessage(tr("QListWidget"), 2000);
}

inline void itemBasedViews::showTreeWidget()
{
	// QTreeWidget 提供一个树状视图
	QTreeWidget *tmp = new QTreeWidget();
	tmp->setColumnCount(2); // 设置列数
	tmp->setHeaderLabels(QStringList{ tr("name"), ("age") });

	QTreeWidgetItem *top1 = new QTreeWidgetItem(tmp);
	QTreeWidgetItem *top2 = new QTreeWidgetItem(tmp, top1);
	QTreeWidgetItem *child11 = new QTreeWidgetItem(top1);
	QTreeWidgetItem *child12 = new QTreeWidgetItem(top1, child11);

	top1->setText(0, tr("family"));
	top2->setText(0, tr("company"));
	child11->setText(0, tr("mother"));
	child11->setText(1, tr("37"));
	child12->setText(0, tr("father"));
	child12->setText(1, tr("40"));

	setCentralWidget(tmp);
	statusBar()->showMessage(tr("QTreeWidget"), 2000);
}

inline void itemBasedViews::showTableWidget()
{
	// QTableWidget 提供一个表格视图
	QTableWidgetItem *item1 = new QTableWidgetItem();
	QTableWidgetItem *item2 = new QTableWidgetItem();
	QTableWidgetItem *item3 = new QTableWidgetItem();

	item1->setText("file");
	item1->setIcon(QIcon("file.png"));
	item2->setText("new");
	item2->setIcon(QIcon("new.png"));
	item3->setText("open");
	item3->setIcon(QIcon("open.png"));

	QTableWidget *tmp = new QTableWidget();
	tmp->setRowCount(2);     // 设置行数
	tmp->setColumnCount(3);  // 设置列数
	tmp->setVerticalHeaderLabels(
		QStringList{ tr("row1"), tr("row2") });
	tmp->setHorizontalHeaderLabels(
		QStringList{ tr("col1"), tr("col2"), tr("col3") });

	tmp->setItem(0, 0, item1);
	tmp->setItem(0, 1, item2);
	tmp->setItem(0, 2, item3);

	setCentralWidget(tmp);
	statusBar()->showMessage(tr("QTableWidget"), 2000);
}
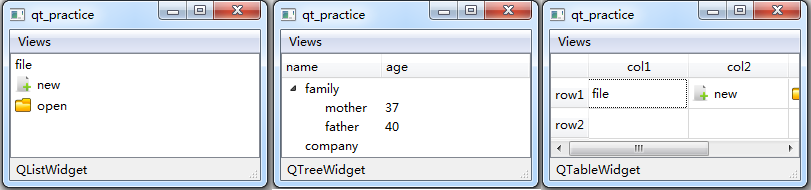
界面外观
一个好的 GUI 程序不仅需要强大的功能,更需要优美的界面,所以才有设计师这一职业的出现。
作为一个跨平台的 UI 开发框架,Qt 也提供了强大而灵活的界面外观设计机制,它经常使用调色板 QPalette 和样式表来对应用外观进行调整;如果你需要不规则窗口(非矩形)的话,查看 QWidget::setMask;想要设置透明度的话,使用 QWidget::setWindowOpacity 会比较方便。
QStyle
QStyle 是一个抽象基类,Qt 的内建组件使用它来完成几乎所有的绘制工作。
你可以使用 QApplication::setStyle() 或 QWidget::setStyle() 来为整个应用或单个组件设置风格,当前环境支持的风格可以使用 QStyleFactory::keys() 进行查看:
("Windows", "WindowsXP", "WindowsVista", "Fusion")
你也可以在运行时指定风格选项:
$ ./myApp -style windowsxp
你还可以使用 QStyle 对自定义组件进行绘制,你甚至可以创建自定义风格类型,具体查看 QStyle。
调色板 QPalette
一个调色板包含三个颜色组:
- Active:当窗口获得焦点时;
- Inactive:当焦点在其他窗口时;
- Disabled:当组件(非窗口)不可用时。
对大多数风格来说,Active 和 Inactive 看起来是一样的。
当你创建一个新的组件时,建议使用调色板而非直接指定某种颜色。
当你修改应用的调色板或某个组件的调色板时,建议使用 QGuiApplication::palette() 或 QWidget::palette() 获取原有的调色板,然后再进行更改,这样会保留原有的未更改的设置,最后再调用 QGuiApplication::setPalette 或 QWidget::setPalette 来使用修改后的调色板。
// myWidget.h
#pragma once
#include <QPalette>
#include <QMainWindow>

struct myWidget : QMainWindow
{
	myWidget(QWidget *parent = 0)
		: QMainWindow(parent)
	{
		QPalette palette = this->palette();
		// 设置窗口背景在聚焦时为绿色、非聚焦时为黄色
		palette.setColor(QPalette::Active, QPalette::Window, Qt::green);
		palette.setColor(QPalette::Inactive, QPalette::Window, Qt::yellow);
		setPalette(palette);
	}
};
样式表
样式表比调色板更加强大,样式表的设置对所有风格、所有系统都有效,并且低层级的样式表会使用高层级中有效的样式表,例如你可以为顶层组件设置一个样式表,那么该样式表对所有子组件有效(如果子组件不设置样式表的话)。
你可以使用 QApplication::setStyleSheet() 或 QWidget::setStyleSheet() 来为整个应用或单个组件设置样式表,但是样式表在设计模式中设置会更加便捷和直观。
当你学完下面的样式表语法之后,查看 Customizing Qt Widgets Using Style Sheets 了解如何使用样式表自定义组件外观。
样式规则
Qt 样式表的术语和语法规则与 HTML CSS 基本相同,一个样式规则由一个选择符(selector)和一个声明(declaration)组成,其中选择符指定改规则形象的组件,声明指定影响该组件的那个属性,如:
QPushButton { color: red }
你可以为多个组件设置相同的属性,只需使用逗号将组件名分隔即可:
QPushButton, QLineEdit, QComboBox { color: red }
多个属性之间使用分号进行分隔:
QPushButton { color: red; background-color: white }
查看 List of Properties 获取支持的样式表属性列表。
选择符类型
| 选择符 | 示例 | 说明 |
|---|---|---|
| 通用选择符 | * | 所有部件 |
| 类型选择符 | QPushButton | QPushButton 及其子类 |
| 属性选择符 | QPushButton[flat=”false”] | flat 属性为 false 的 QPushButton |
| 类选择符 | .QPushButton | QPushButton,不含子类 |
| ID 选择符 | QPushButton#okButton | 对象名为 okButton 的 QPushButton |
| 后代选择符 | QDialog QPushButton | QDialog 的子孙部件 QPushButton |
| 亲子选择符 | QDialog > QPushButton | QDialog 的直系子部件 QPushButton |
子控件
对于某些复杂的部件,可能需要访问它们的子控件(subcontrol),如 QComboBox 的下拉按钮或 QSpinBox 的上下箭头等,可以通过选择符来访问这些子控件:
QComboBox::drop-down { image: url(dropdown.png) }
查看 List of Sub-Controls 获取支持的子控件列表。
伪状态
伪状态被选择符用来指定某个部件在某个特定状态时的风格,它出现在选择符的末尾,并使用冒号分隔:
QPushButton:hover { color: white }
上面的规则代表当鼠标悬停在 QPushButton 上时,QPushButton 的文字颜色变为白色。
伪状态支持使用感叹号来表示否定:
QPushButton:!hover { color: white }
伪状态还支持伪状态链,即将多个伪状态以链的形式结合在一起,以达到逻辑与的效果:
QCheckBox:hover:checked { color: white }
QPushButton:hover:!pressed { color: blue; }
你也可以使用逗号来达到逻辑或的效果:
QCheckBox:hover, QCheckBox:checked { color: white }
伪状态还可以与子控件联合使用:
QComboBox::drop-down:hover { image: url(dropdown_bright.png) }
查看 List of Pseudo-States 获取支持的伪状态列表。
冲突解决
如果有多个规则对相同的属性指定了不同的值,就会造成冲突,如:
QPushButton#okButton { color: gray }
QPushButton { color: red }
解决这个冲突的原则是:越特殊的规则优先级越高,如果特殊性一致则越靠后的规则优先级越高,所有的选择符特殊性都一样,不管继承关系如何。
下面两个规则的特殊性一致,虽然 QPushButton 继承自 QAbstractButton:
QPushButton { color: red }
QAbstractButton { color: gray }
更详细的确定规则特殊性的规范查看 Conflict Resolution。
层叠与继承
部件有效的样式表是通过合并该组件所有祖先的样式表、当前设置的样式表和 QApplication 设置的样式表来得到的,如果发生冲突的话,不管特殊性如何,低层级的规则优先。
部件并不会自动继承其父组件的 font 和 color 样式表属性,如果你想要达到这个效果的话,局部可以类似使用:
QGroupBox, QGroupBox * { color: red; }
整体可以使用:
QCoreApplication::setAttribute(Qt::AA_UseStyleSheetPropagationInWidgetStyles, true);
命名空间与 Q_PROPERTY
namespace ns {
    class MyPushButton : public QPushButton {
        // ...
    }
}

// ...
qApp->setStyleSheet("ns--MyPushButton { background: yellow; }");
对象属性值可以使用 qproperty-<property name> 进行设置:
MyLabel { qproperty-pixmap: url(pixmap.png); }
MyGroupBox { qproperty-titleColor: rgb(100, 200, 100); }
QPushButton { qproperty-iconSize: 20px 20px; }
资源管理
当你开发某个应用时,可能需要读取很多的文件,这个时候你可以使用绝对路径,但是如果运行环境改变的话,又要一个个的去修改,非常麻烦!那么如果将所有这些文件都放到可执行文件目录下,然后使用相对路径不就可以避免这个问题了吗?确实,如果你需要的文件的容量足够小的话,比如就两三兆,也许没什么大问题;但是如果容量超级大,几个G的话,传一次可能需要很久才能传完。
Qt 使用资源文件来解决这个问题,你可以向资源文件中添加你想要读取的文件,注意只能是读取的文件,你不能对资源文件中的文件进行修改。编译时,Qt 会对加入的资源自动进行压缩,这样就能使生成的最终产物的容量尽可能最小。
Qt 的资源文件使用 .qrc 为后缀,如果你要将某个资源文件应用到项目中,需要向 .pro 文件中添加:
RESOURCES += myqrc.qrc
资源文件的格式是基于 XML 的:
<RCC>
    <qresource>
        <file>images/new.png</file>
		<file>images/open.png</file>
		<file>E:/qt_practice/image/quit.png</file>
    </qresource>
</RCC>
其中文件的路径可以是绝对的,也可以是相对 .qrc 文件所在目录的。默认情况下你可以使用如下两种方式访问其中的文件:
:/images/new.png
qrc:///images/new.png
你可以为这些文件指定一个路径前缀:
<qresource prefix="/myresources">
    <file>images/new.png</file>
	<file>images/open.png</file>
	<file>E:/qt_practice/image/quit.png</file>
</qresource>
这样使用时就需要以 :/myresources/images/new.png 的形式进行使用了。
你还可以为某个文件指定一个别名:
<file alias="new.png">images/new.png</file>
这样就能使用别名访问对应的文件了::/myresources/new.png。
如果你需要根据系统语言环境使用不同的资源文件,使用 lang:
<qresource>
    <file>cut.jpg</file>
</qresource>
<qresource lang="fr">
    <file alias="cut.jpg">cut_fr.jpg</file>
</qresource>
这样当系统语言为法语时,将使用 cut_fr.jpg,否则使用 cut.png。
示例:
qt_practice
├── main.cpp
├── myWidget.h
├── resource.qrc
└── images
    ├── new.png
    ├── open.png
    └── quit.png
<!-->resource.qrc<-->
<RCC>
    <qresource>
        <file alias="new">images/new.png</file>
		<file alias="open">images/open.png</file>
		<file alias="quit">E:/qt_practice/images/quit.png</file>
    </qresource>
</RCC>
// myWidget.h
#pragma once
#include <QIcon>
#include <QAction>
#include <QMenuBar>
#include <QMainWindow>

struct myWidget : QMainWindow
{
public:
	myWidget(QWidget *parent = 0)
		: QMainWindow(parent)
	{
		QAction *openAction = new QAction();
		openAction->setIcon(QIcon(":/open"));
		openAction->setText(tr("&Open"));

		QAction *newAction = new QAction();
		newAction->setIcon(QIcon(":/new"));
		newAction->setText(tr("&New"));

		QAction *quitAction = new QAction();
		quitAction->setIcon(QIcon(":/quit"));
		quitAction->setText(tr("&Quit"));

		QMenu *menu = menuBar()->addMenu(QString("&File"));
		menu->addAction(openAction);
		menu->addAction(newAction);
		menu->addAction(quitAction);
		menu->insertSeparator(quitAction);
	}
};
#include "myWidget.h"
#include <QApplication>

int main(int argc, char *argv[]) {

	QApplication app(argc, argv);

	myWidget window;
	window.resize(250, 150);
	window.move(300, 300);
	window.setWindowTitle("Resource");
	window.show();

	return app.exec();
}
$ qmake -project # 生成 .pro 文件,添加 QT += widgets
$ qmake
$ mingw32-make
$ release\qt_practice.exe